To prevent hours of frustration and confusion, it helps to quickly identify and fix audio issues on Windows 10 and 11. Some troubleshooting methods involve running Windows audio troubleshooter built-in tool, reinstalling drivers, inspecting the audio services, and adjusting several other audio settings.
By approaching troubleshooting with patience, attention to detail, and a healthy dose of perseverance, your computer should soon be harmoniously playing sounds as intended. Whether it’s crackling or distorted sound, or something more marginally jarring, the potential issues can be addressed and fixed.
Thus far, this article aims to provide the essential steps to troubleshoot audio issues on Windows 10 and 11—with the focus on diagnosing the problem, identifying potential solutions, and then implementing a proper fix.
Furthermore, basic audio troubleshooting tips to help resolve common audio issues will be discussed at the beginning of the article before diving into more technical approaches.
Let’s get it started!
- Basic audio troubleshooting tips to fix audio issues on Windows 10 and 11
- Troubleshooting Audio Issues in Windows 10
- Troubleshooting Audio Issues in Windows 11
- How to fix audio issues on Windows 10 and 11
Basic audio troubleshooting tips to fix audio issues on Windows 10 and 11
Before making any technical adjustments, check for obvious causes of audio issues first and attempt simple fixes:
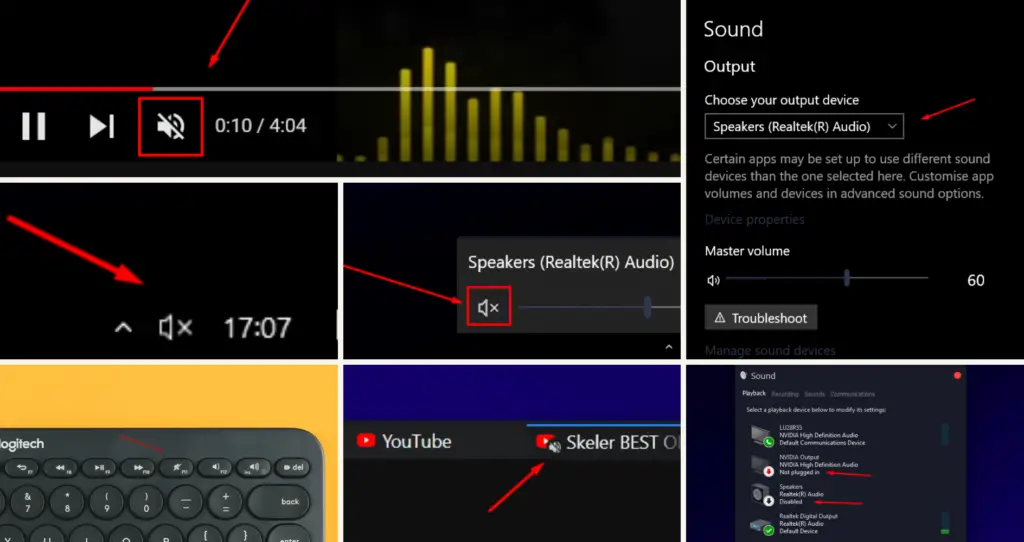
- Ensure sound is not set to silent mode or disabled at the hardware level via a dedicated button on your keyboard or mouse.
- If using a keyboard with volume controls, press the corresponding key, turn the controller knob, or move the slider to check the on-screen volume indicator.
- Check the “Speakers” icon in the lower right corner of the desktop. An “X” indicates that the sound is muted, so right-click on it, select “Open Sound settings,” and click on the muted icon to unmute it.
- Check for disabled or not plugged in headphones/speakers and ensure they are connected to the PC. Plug in your device or right-click and select “Enable.”
- Check the volume controls on your headset
- Check if audio settings in applications are not preventing sound playback.
- Check if the sound is turned off in the interface or application settings.
- Ensure audio isn’t paused or disabled in settings within a web browser.
- Check the default audio device and ensure you’re using the right device.
Troubleshooting Audio Issues in Windows 10
When troubleshooting audio issues in Windows 10, there are a few steps to take in order to fix any potential sound problems, such as:
- Run Audio Troubleshooter
- Perform a Windows Update
- Update or reinstall audio drivers
- Turn off Windows Sonic
- Disable Audio Enhancements
- Disable “Allow applications to take exclusive control of this device”
- Adjust microphone settings
When audio is not working, or there is no sound on Windows 10, these measures serve as the cornerstone of troubleshooting audio problems.
Perform an Audio Troubleshooter
If you’re having sound and audio problems in Windows 10, use the Windows audio troubleshooting tool—designed to quickly identify, diagnose, and resolve common problems with audio.
To perform an audio troubleshooter:
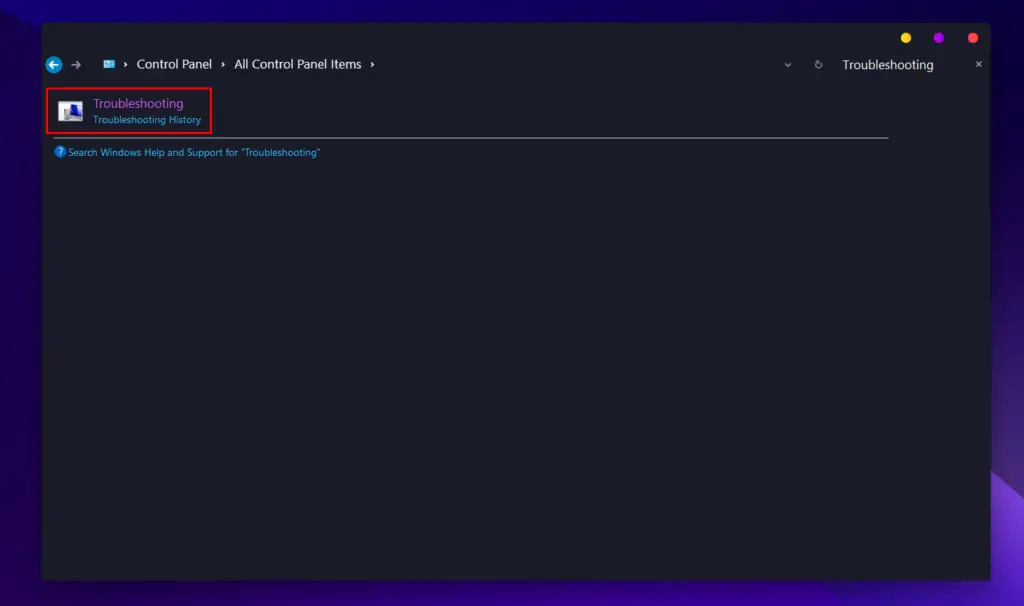
- Head to “Control Panel“, then search for “Troubleshooting“.

- Click on “Troubleshooting.”
- Underneath “Hardware and Sound” select “Troubleshoot audio playback“.
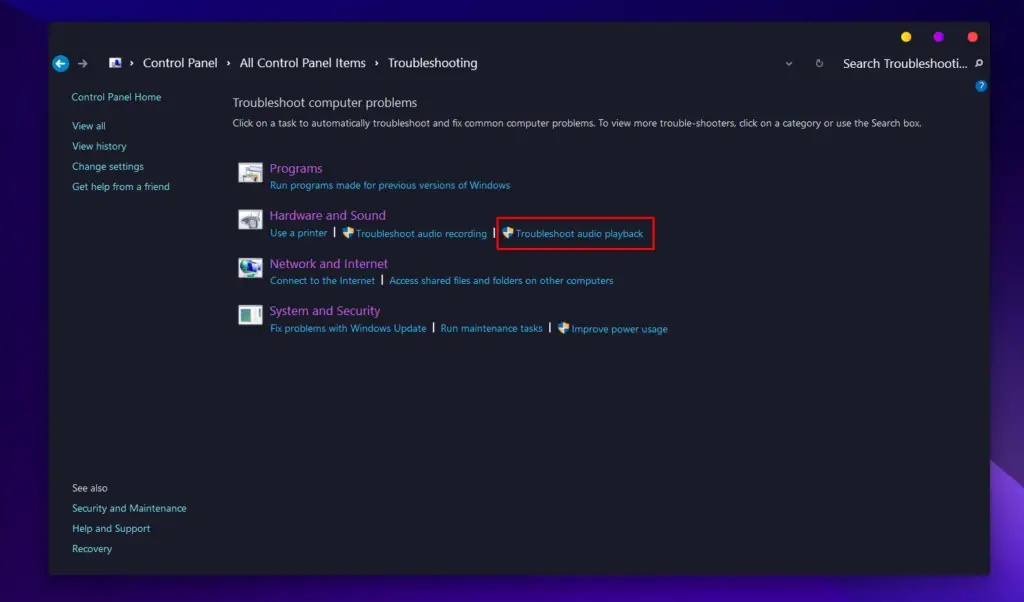
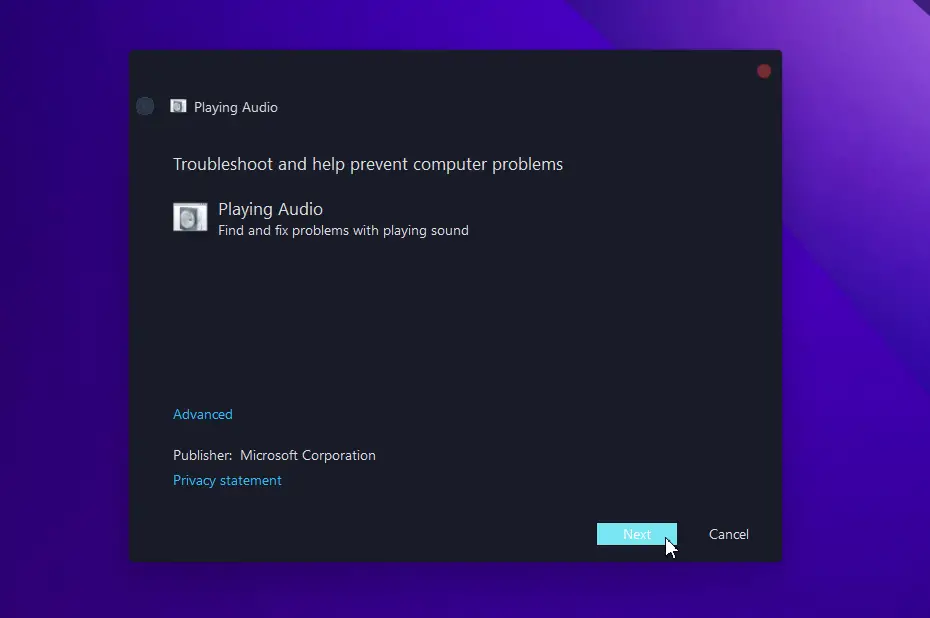
- The “Find and fix problems with playing sound is selected by default.
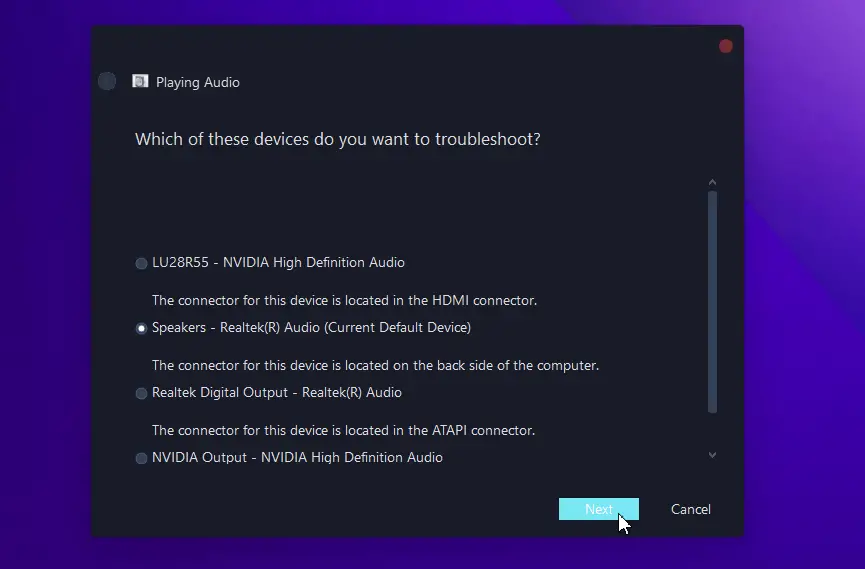
- Now click “Next” and choose which device you want to troubleshoot.
- Follow the on-screen directions.
You can get your sound back with the Windows 10 Audio troubleshooter in just a few steps by identifying and correcting the audio issues.
You can also right-click the audio icon in the taskbar and choose “Troubleshoot sound problems” to resolve the audio issue.
By going through the above steps, you are likely to successfully resolve the sound problems with your Windows 10 system.
How this helps: Windows Audio Troubleshooter is an automatic fix-it tool that can help you fix various sound issues, such as no sound, audio not working, stuttering, crackling, audio glitches, choppiness, distortion, or static noise.
Perform a Windows Update
Sometimes audio problems on Windows 10 are caused by outdated drivers. To check and install the updated drivers, use the Windows Update utility.
To perform a Windows update:
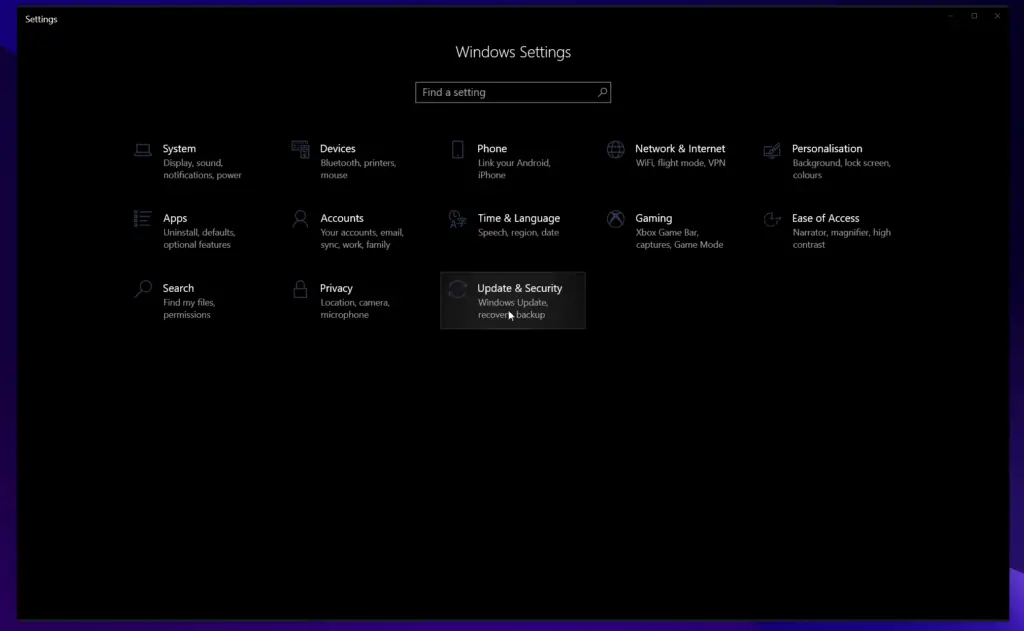
- Go to the “Start Menu“, then select “Settings“.

- Click on “Update & Security“.
- Now, click on “Check for Updates“.
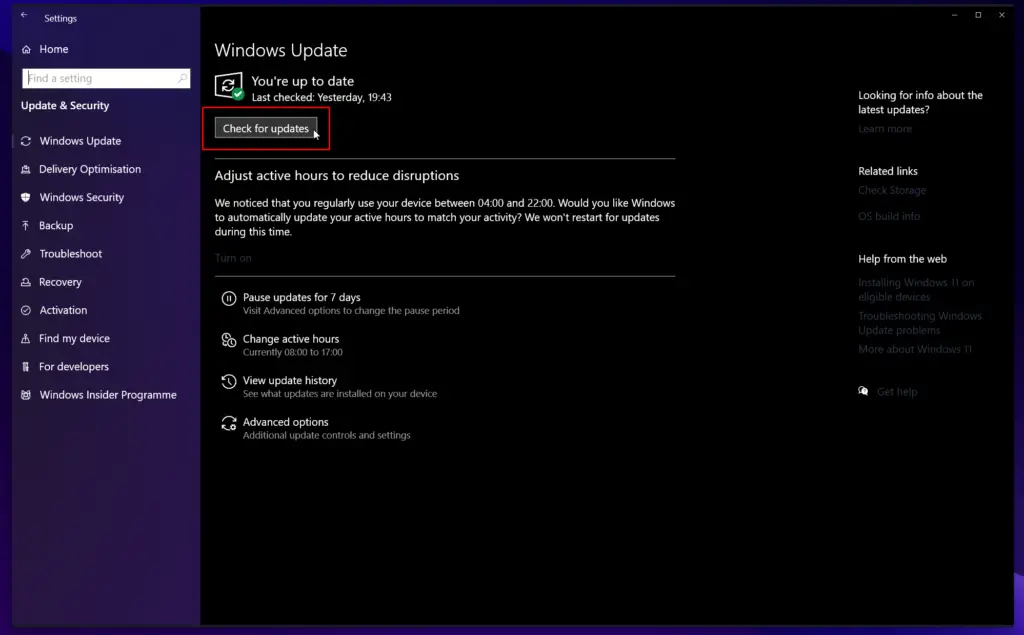
- If there are any available updates, Windows will download and install them automatically.
- After the update is complete, restart your computer.
Now check and see if the audio issues are still present when you use headphones.
Note that Windows updates can be highly troublesome, often reactivating or disabling features despite user preferences. This requires you to readjust your audio settings.
How this helps: Updating the drivers regularly ensures compatibility of the system with the audio device, which should eliminate connectivity issues, lack of sound, and avoids Windows detecting no audio output device.
Update/reinstall audio drivers
Realtek High Definition audio driver failure is characterized by WAV audio playback issues, the audio device being used by another application, MIDI output errors, and an inability to play a specific audio file.
Updating the sound drivers can be helpful in these cases, such as if the sound suddenly stops working, if crackling or dropouts occur, or if you want to get more features. As such, a guide on how to update, uninstall and reinstall sound drivers on Windows 10 is necessary.
Here are the steps to update and reinstall audio drivers on Windows 10:
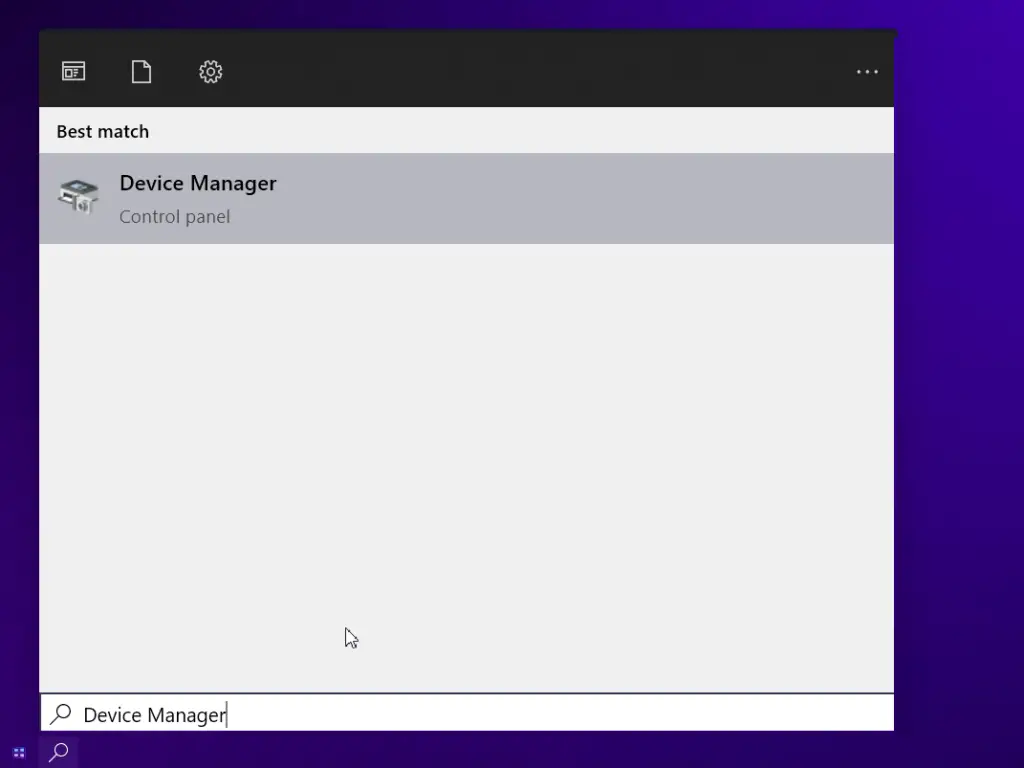
- Search for Device Manager.
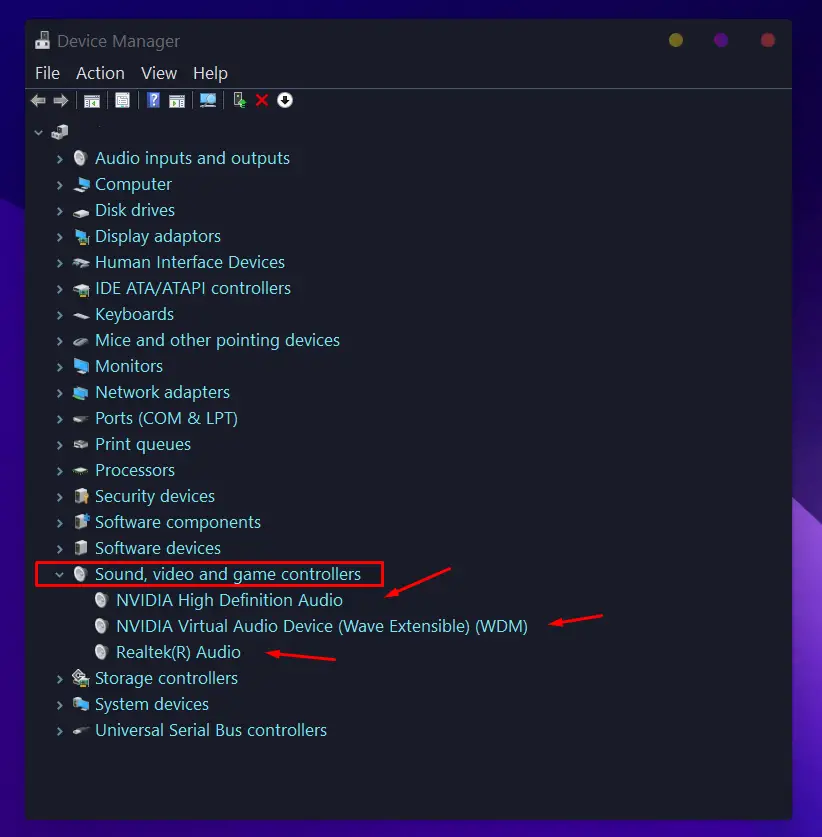
- Expand the Sound, video and game controllers section.
- Select the audio driver from the list and right-click it.
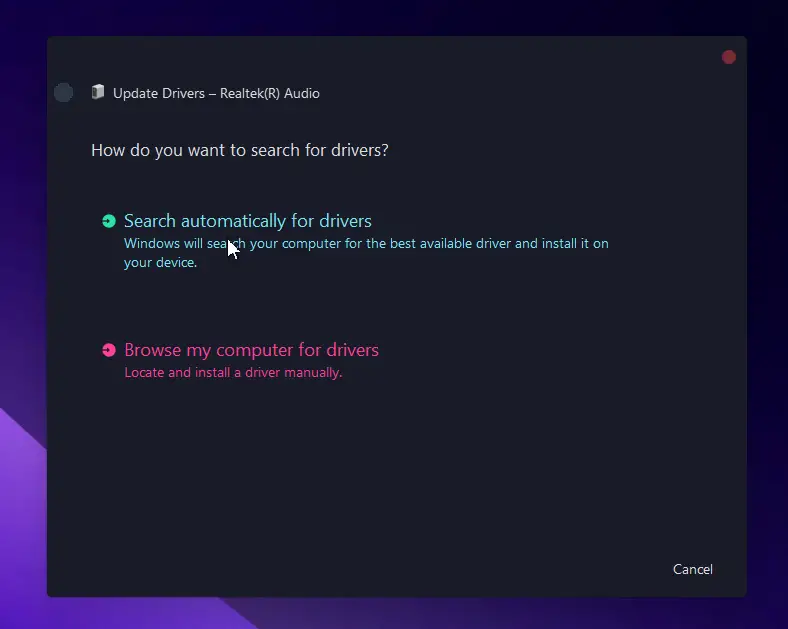
- Select Update driver and then “Search automatically for drivers.”
- If the driver is already up to date, you can Uninstall device and restart your computer.
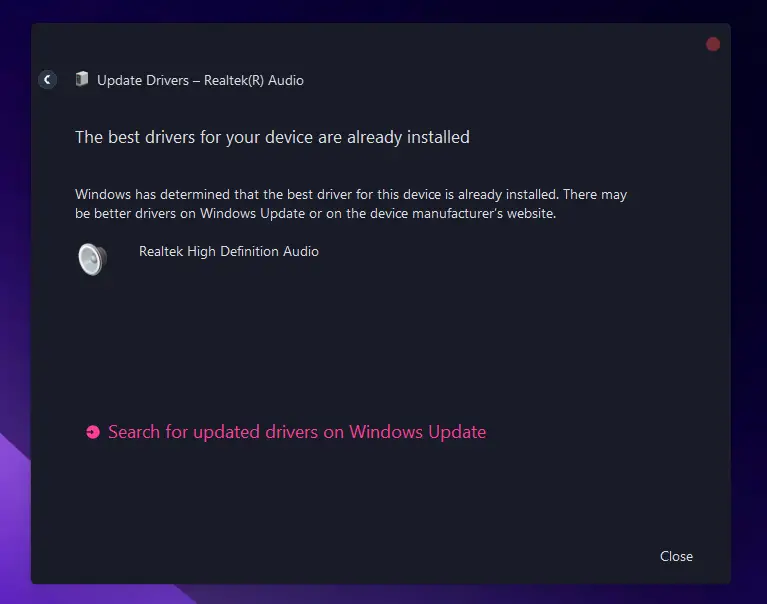
- Windows will automatically reinstall the old driver, or you can download the latest one from the internet.
- Repeat steps 2-5 for “Audio inputs and outputs“.
Another method for updating sound drivers is:
- Right-click the audio icon on the bottom right of the taskbar.
- Select “Open Sound Settings.”
- Click on “Device Properties” and select “Driver” tab.
- If your drivers are outdated, select “Update Drivers” or “Reinstall Drivers” to update your audio drivers to the latest version.
If for any reason, Windows doesn’t automatically update the missing drivers. You can use a third-party tool like Driver Easy to detect and download the correct driver version. Here’s how:
- Download and install Driver Easy.
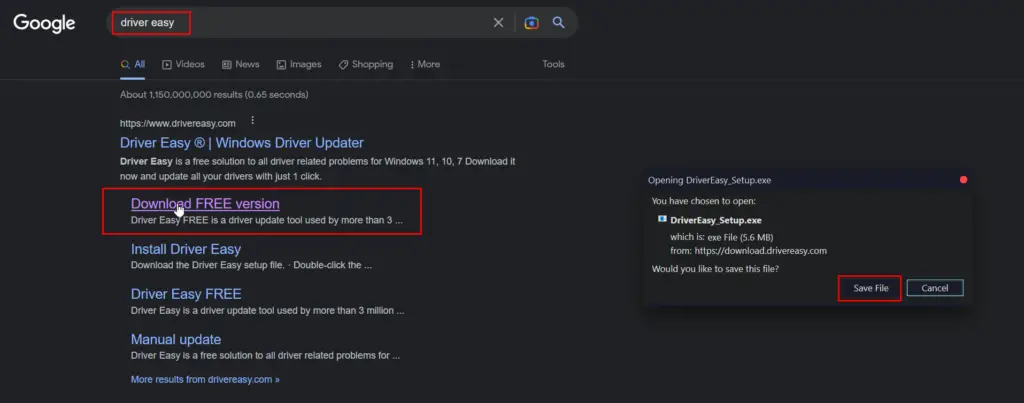
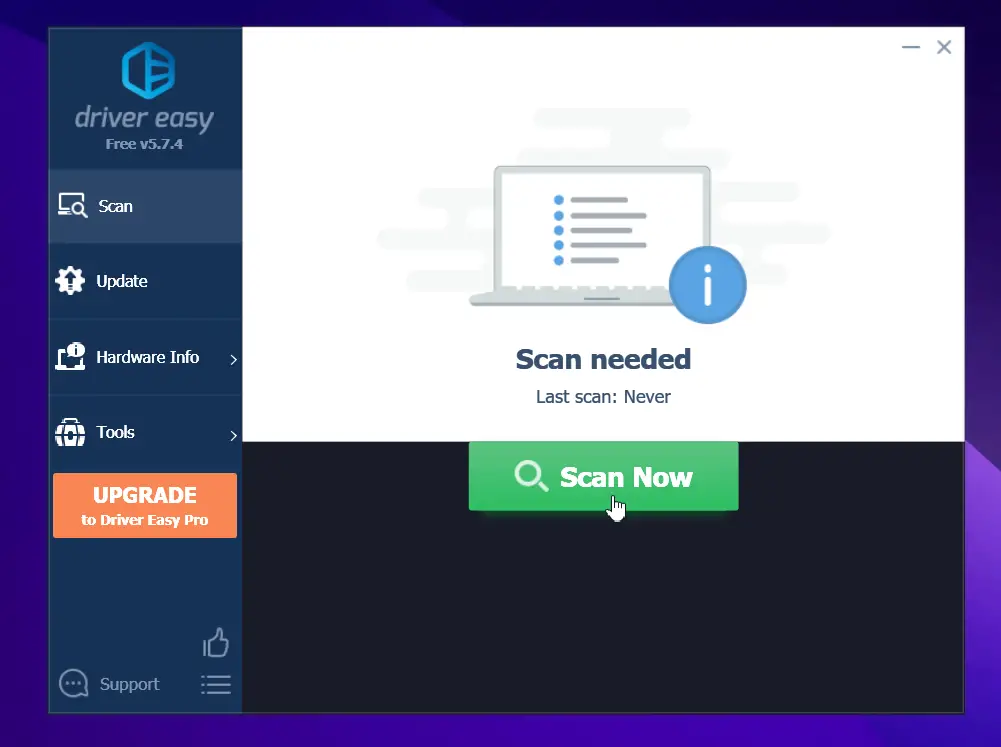
- Run Driver Easy and click the Scan Now button. Driver Easy will then scan your computer and detect any drivers that require updating.
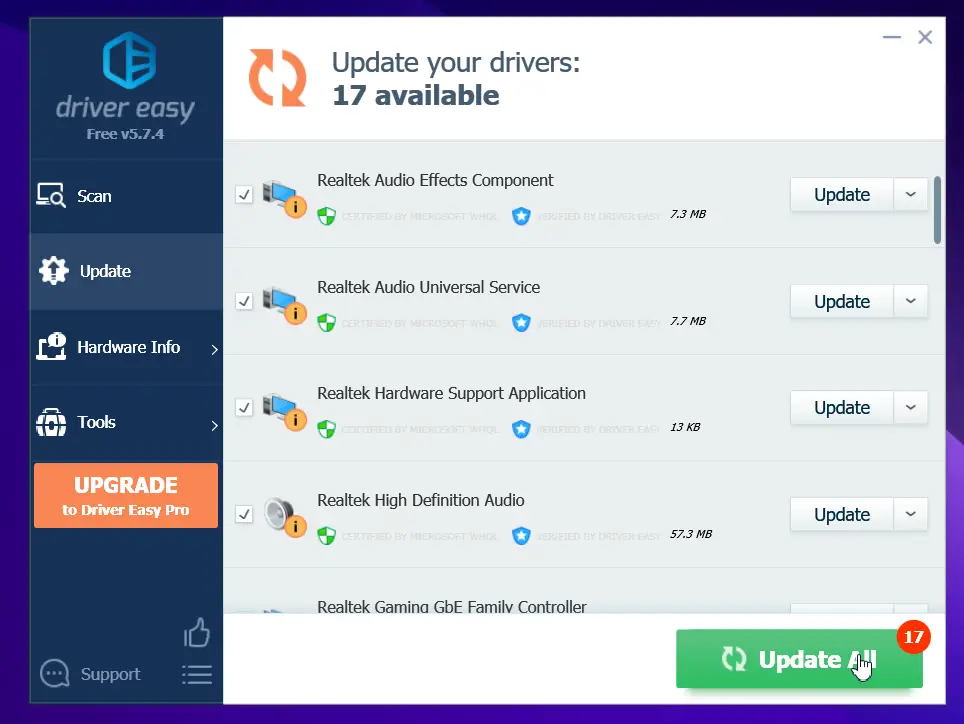
- Click the Update button next to your audio driver to download and install the correct version of that driver automatically (Note: Driver Easy Pro version is required).
- Restart your PC after the installation is completed to make the updates take effect.
How this helps: No audio output device is an issue that appears when no audio driver is installed, the latest version is missing, or no audio device is plugged in. Additionally, installing or reinstalling the audio drivers on Win 10 helps fix the crackling sound, static noise, distortion, and other audio problems, such as playback issues or the inability to play certain audio files.
Turn off Windows Sonic
Now, it’s time to learn how to turn off Windows Sonic in Windows 10 to prevent conflicts between third-party sound applications and other audio issues.
Here are the step to turn off Window Sonic:
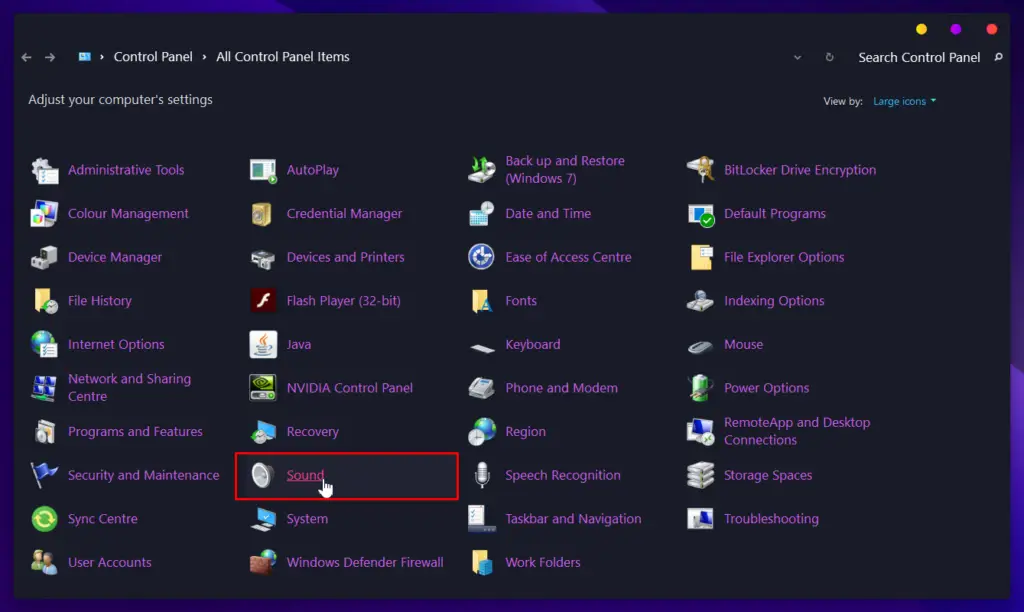
- Open Control Panel.

- Type “Sound” in the search box, then click “Sound” from the results.
- In the “Playback” tab, right-click on your default audio device and click “Properties.”

- On the “Spatial Sound” tab, click on the drop-down menu underneath spatial sound format and select “Off“.
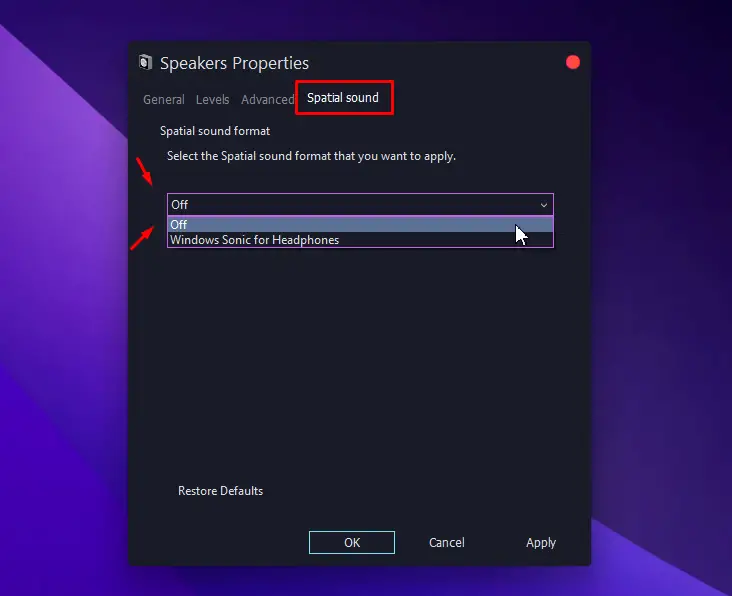
- Click “Apply” to save the changes, then click “OK” to exit.
Your Windows Sonic settings should now be turned off, and any sound related problems should be over.
To turn it off, right-click on the volume icon in your taskbar and select “Spatial Sound (Windows Sonic for Headphones).” Once here, select the “Off” option to disable Spatial Sound – this should do the trick.
However, a much simpler way to disable surround sound on Windows 10 is by
- Right-clicking the Sound icon in the system tray.
- Hover over “Spatial Sound” and select “Off” from the options that appear.
How this helps: Disabling Windows Sonic gets rid of the surround sound effect, which is naturally accompanied by reverb, distortion, and other off-putting sonic artifacts. This, in turn, can lead to a better overall sound experience with less sound distortion and more natural sound reproduction.
Disable Audio Enhancements
Fixing audio issues on Windows 10 involving echo, distortion, static noise, or bassy sound requires a few technical steps. Disabling any audio enhancements is the first step to get rid of audio issues. To disable audio enhancements, users have three methods (each doing the same thing, just through different paths).
If the Enhancements tab doesn’t show up, open Device Manager, expand Sound, video and game controllers, right-click on Realtek(R) Audio, click Update driver, select Browse my computer for drivers and then select “Let me pick from a list of available drivers on my computer” and use “High Definition Audio Device”. Restart PC.
Method #1: Disabling audio enhancements through the Sound icon in the taskbar:
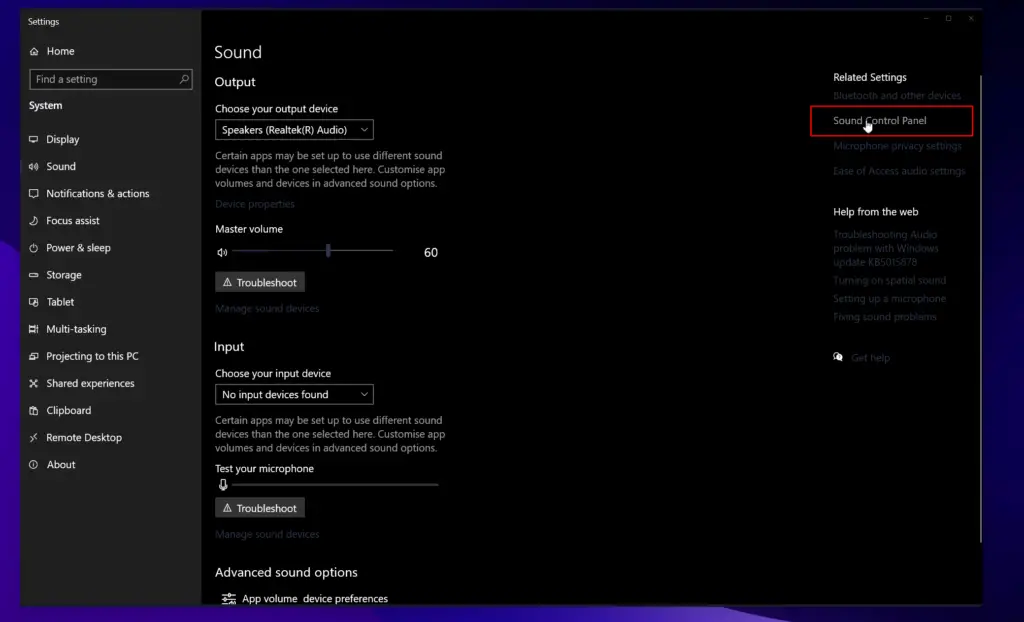
- Right-click the audio icon in the bottom taskbar, click on “Open sound settings” then “Sound Control Panel.”
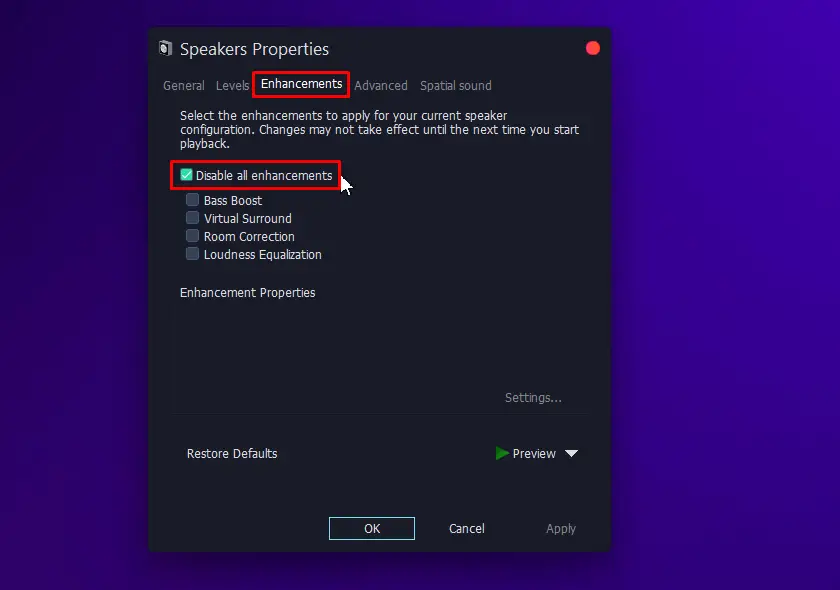
- Open properties of your default sound device and check “Disable all enhancements” in the “Enhancements” tab.

Following these steps should resolve most audio-related problems on Windows 10, allowing users to enjoy a vital, glitch-free experience.
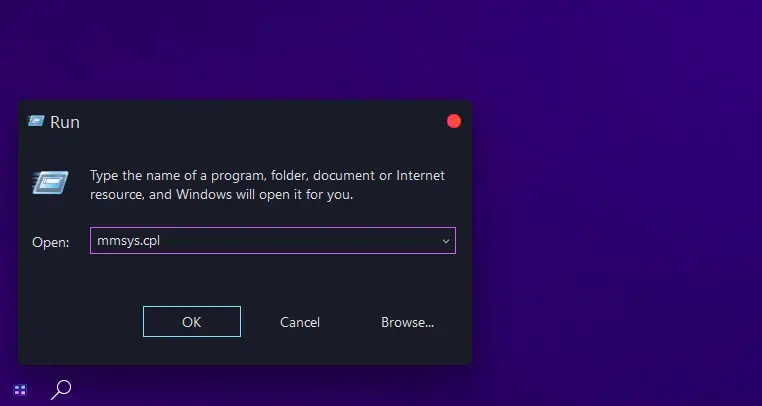
Method #2: How to disable audio enhancements using the Run command:
Press the Windows + R key to open the Run dialogue box, then type in “mmsys.cpl” and press Enter.

Now, to adjust your sound settings:
- From the Playback tab, select your default audio device
- Right-click and select Properties
- Click on the Enhancements tab and adjust your settings.


- Finally, select OK to apply changes.
Method #3: How to disable audio enhancements in Control Panel:
- Go to Control Panel.
- Once the Control Panel is open, go to the “Hardware and Sound” category and then “Sound” if the settings are displayed by “Category”; otherwise, go directly to “Sound.”
- In Hardware and Sound, select “Manage audio devices” or “Sound” which will open the “Sound” dialogue box.
- Double-click on “Speakers” or your default audio device to open the Properties menu and go to the “Enhancements” tab, check the box that says “Disable all enhancements,” and then hit “Apply.”
- All sound enhancements should now be disabled. Hit the “OK” button to save the changes and exit back to the main “Sound” window.
How this helps: Similarly to Windows Sonic, audio enhancements can create lots of problems in terms of sound quality and clarity. Disabling Windows audio enhancements will help Windows users to get rid of bassy or distorted sound, distant or muffled sound & other scenarios of sound quality deterioration.
Disable “Allow applications to take exclusive control of this device”
When other applications can take exclusive control of a device on Windows 10, it can cause issues with audio and sound performance. To disable this option:
- Press
Win + Rand type mmsys.cpl to open the Sound Control Panel.
- Open the “Properties” of your sound device by right-clicking on the device and selecting.
- Go to the “Advanced” tab and uncheck the box labelled “Allow applications to take exclusive control of this device”.
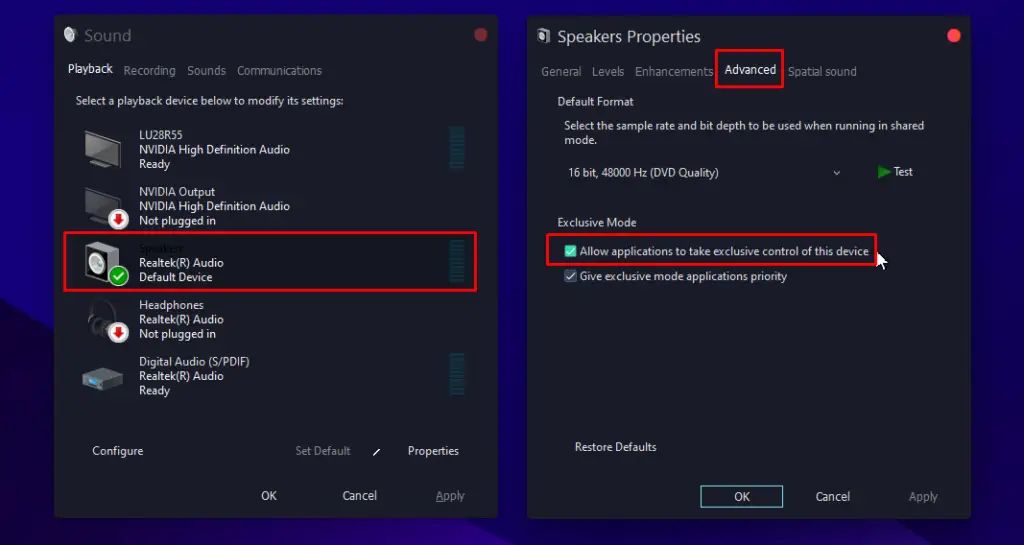
- Click OK to save the changes.
How this helps: This prevents other applications from taking exclusive control of the sound card, which can cause issues with sound performance. By disabling this option, multiple applications can share the sound card, resulting in better sound quality.
Adjust microphone settings
Adjusting your microphone settings can be critical to getting the best sound quality out of your headphones.
By giving careful consideration to recording levels, microphone boost, enhancements, noise suppression, acoustic echo cancellation, and eliminating unwanted audio feedback, you can make sure that you’re getting the most out of your listening experience.
Here’s how to adjust your microphone settings (disable listen to this device, reduce microphone sensitivity, and echo occurrences):
- Open “Sound Settings” by right-clicking the audio icon on the bottom right of the taskbar.
- Select “Sound Control Panel”.

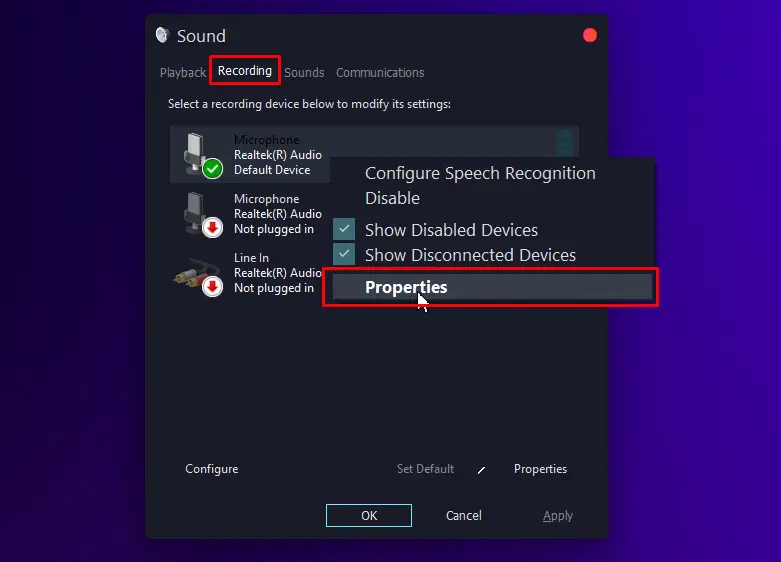
- Go to the “Recording” tab.
- Open Microphone device properties window by double-clicking it.
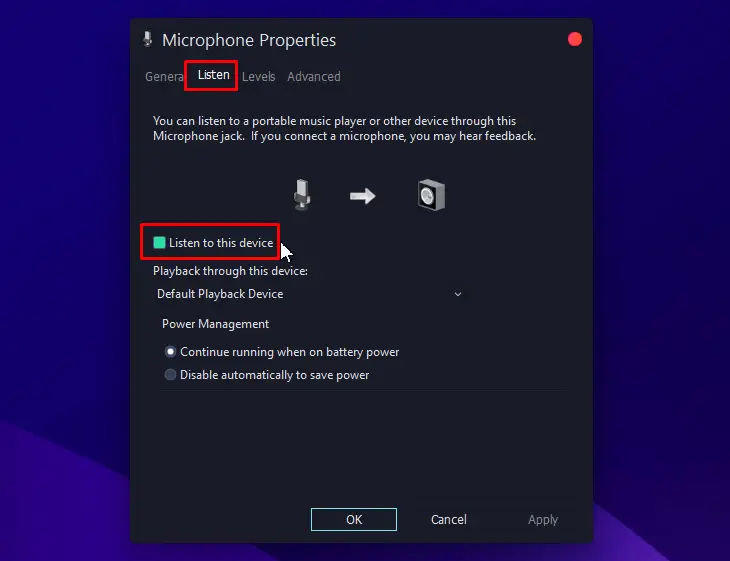
- Click on the “Listen” tab and disable the “Listen to this Device” option to prevent your microphone from playing back sound in the headphones and reduce any echo or noise you’re hearing.
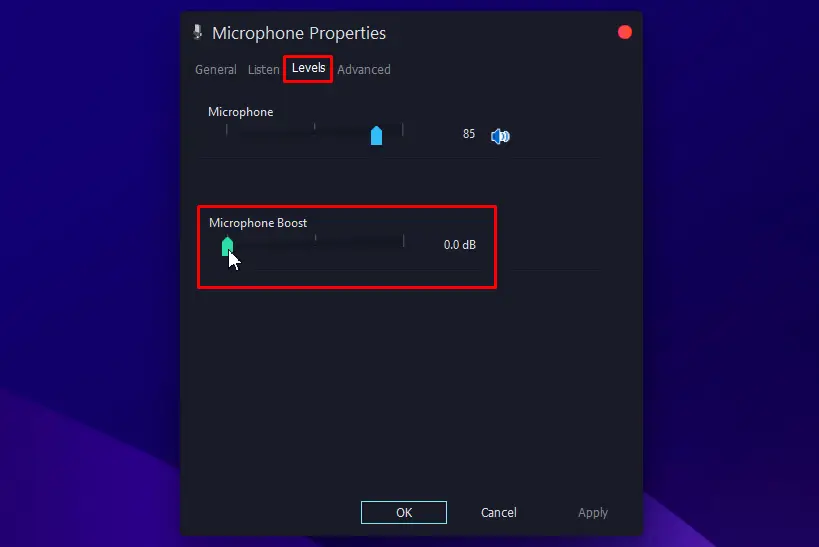
- Go to the “Levels” tab and drag the “Microphone Boost” slider to 0 dB to reduce the occurrence of audio feedback.
- Go to the “Enhancements” tab and enable the options “Noises Suppression” and “Acoustic Echo Cancellation”.
How this helps: Echoey headphones and background noise can make your audio sound unclear. Adjusting microphone settings will help Windows users to improve sound quality by eliminating echoing, background noise, loopback, and volume issues often experienced during voice calls.
Troubleshooting Audio Issues in Windows 11
Fixing most sound problems encountered in Windows 11 requires knowledge on how to
- Perform an Audio Troubleshooter
- Update audio drivers
- Inspect Audio Services
- Disable Audio Enhancements
- Disable Windows Sonic (Spatial Sound)
- Disable “Allow applications to take exclusive control of this device”
- Adjust microphone settings
Perform an Audio Troubleshooter
Audio troubleshooting on Windows 11 can be a challenge—especially when an unforeseen sound problem arises. After all, a host of factors can affect sound quality, such as faulty audio card, outdated drivers, or incorrect sound settings.
To ensure seamless audio performance, Windows 11 offers an audio troubleshooter which allows the user to quickly and easily diagnose and resolve audio-related issues.
This user-friendly tool makes it easy to reset audio settings and fix sound-related problems.
Below are the steps for running an audio troubleshooter on Windows 11:
- From the Start menu, select “Settings.”
- Select “Update & Security” and then open “Troubleshoot“.
- Select “Playing Audio” from the list, and click the “Run the Troubleshooter” button.
The audio troubleshooter will launch and will automatically detect which audio problems (if any) are affecting your Windows 11 PC. It will provide helpful suggestions to solve the problem and will help reset any incorrect settings or driver issues, or suggest any additional updates that may be required to solve the problem.
Update Audio Driver
Updating or reinstalling audio drivers in Windows 11 takes a few steps.
Open Device Manager by right-clicking the Start icon. Now find Realtek(R) high Definition Audio and all the other audio drivers in the “Sound, video and game controllers” list, and update them. To do so:
- Right-click, and select “Update driver“
- Select “Automatic search“.
You can also uninstall the audio drivers and restart your computer as this will allow Windows to install the latest drivers automatically. If the automatic search fails, you can download new drivers directly from the manufacturer’s website.
Inspect Audio Services
Sound problems can occur when the audio service is not running or does not respond. To fix the audio service not responding in Windows 11: Open the Services window (Windows + R, type services.msc and click OK), and confirm that the “Windows Audio,” “Windows Audio Endpoint Builder,” “Remote Procedure Call” services are running and their startup type is set to Automatic.
If they’re not set to run Automatically, double-click on each service, set their startup type to “Automatic,” then restart the audio services by clicking on the “Stop” button, then “Start.” Restart your computer and check whether the changes solved the issue.
If the steps above did not fix the audio services issues, try to:
- Uninstall audio software
- Uninstall and update the audio driver
- Perform a system restore
Disable Audio Enhancements
Troubleshooting audio issues on Windows 11 can be a daunting prospect, but disabling audio enhancements can be an effective way of resolving most audio issues on your Windows 11 PC.
By disabling audio enhancements, users can improve sound quality and ultimately eliminate any distortion, reverberations, hissing, or static sound in their headphones or speakers.
To do this on Windows 11, users should go to System and Sound, select All Sound Devices, switch the Enhance Audio control to Off.
Another way to disable Audio Enhancements in Windows 11:
- Go to Control Panel and type “Sound,” and click on “Change sound card settings”
- Double-click “Speakers” or your default audio device to open the Properties section
- Go to the “Enhancements” tab and tick “Disable all enhancements.”
- Click OK to confirm and save the changes
Disable Windows Sonic (Spatial sound)
For Windows 11 systems:
- Go to the Search menu and type “Settings.”
- Select the “Sound” tab and scroll down to the “All sound devices” option within the “Advanced” section.
- Click on your audio output device, and under the “Spatial sound” section, switch the “Type” to Off
Disable “Allow applications to take exclusive control of this device”
When other applications can take exclusive control of a device on Windows 11, it can cause issues with audio and sound performance. To disable this option:
- Press
Win + Rand type mmsys.cpl to open the Sound Control Panel. - Open the “Properties” of your sound device by right-clicking on the device and selecting.
- Go to the “Advanced” tab and uncheck the box labelled “Allow applications to take exclusive control of this device.”
- Click OK to save the changes.
Adjust microphone settings Windows 11
If you want to stop hearing yourself in the headset or get rid of the unwanted echo audio, you need to disable microphone playback and reduce microphone sensitivity.
Disable microphone listen to this device
To stop your microphone from listening through a playback device in Windows 11, follow the steps:
- Press
Win + Rand type mmsys.cpl - Head to the “Recording” tab.
- Right-click on the microphone you are using and click on Properties.
- Go to the “Listen” tab.
- Uncheck the “Listen to this device” checkbox.
- Click OK.
Once this feature is disabled, you’ll stop hearing yourself when talking into the mic. This will fix echo in headsets and other audio-related issues.
Reduce microphone sensitivity
To reduce microphone sensitivity to prevent acoustic feedback and echo issues in Windows 11 when your microphone is too close to your earcups or speakers, follow the steps:
- Right-click on the sound icon in the system tray and click “Sound settings.”
- Go to “Advanced settings” and click on “More sound settings“.
- Head to the “Recording” tab.
- Right-click on the microphone you are using and click on Properties.
- Go to the “Levels” tab.
- Adjust the microphone slider to reduce the input volume.
- Click OK.
By reducing the input volume, you can reduce the microphone’s sensitivity to surrounding noise and feedback. This should improve voice quality, reduce mic clipping when talking into the mic, and eliminate echos and distortion generated by audio feedback.
How to fix audio issues on Windows 10 and 11
If you have ever experienced the frustration of audio issues on Windows 10 or 11, then you know the feeling of wanting to pull your hair out.
To make matters easier, below you have some quick solutions to fix:
- Audio driver issues
- No audio output device is installed
- Choppy audio
Fix audio driver issues
Audio issues on Windows 10 and 11 can be troublesome to fix. The best approach here is to troubleshoot the audio driver, as it is often the source of the issue. To do this, search for “Device Manager” in the search box. Once opened, expand the “Sound, video, and game controllers” section in the menu, and locate the audio driver.
Double-click on Realtek(R) Audio driver and all the other drivers and check if the device status shows the message “This device is working properly.” Troubleshooting accordingly should fix most of the issues—it is wise to take advantage of relevant support articles regarding error codes that may be displayed.
No audio output device is installed
Fixing the issue of no audio output device is installed involves two key steps.
- Downloading the necessary audio drivers from the device manufacturer’s website and ensuring they are compatible with the system
- And secondly, installing them correctly.
Following these steps should result in the audio driver appearing under Sound, Video, and Game controllers in Device Manager.
Choppy audio
Crackling, popping, and other sound issues can stem from misconfigured audio settings and underlying hardware related problems.
To fix choppy audio in Windows 11 or 10, set the minimum and maximum processor state to the maximum and use 24-bit audio.
Here are the steps to increase the minimum and maximum processor state:
- Press
Win + Iand search for “Power & Sleep“, or search directly into the search box. - Select “Additional Power Settings“.
- Within the Power Options window select “Change plan settings” under the current power plan or “Balanced (recommended)“.
- Select “Change advanced power settings“.
- In the resulting window, expand “Processor power management“, then “Minimum processor state“.
- Set the minimum processor state to 100% and the maximum processor state to 100%.
- Click Apply and then OK.
Now change the Default Format to 24-bit audio:
- Press
Win + Rand type mmsys.cpl - Double-click on your audio device and select the “Advanced” tab
- Click on the drop-down menu under the Default Format and select “24-bit, 44100 Hz (Studio Quality)“
- Click Apply and OK to save your changes