For many of us, our headphones’ clear and crisp sound is a non-negotiable. But when the headphones start producing a grainy, static, and distorted sound, it can bring a quick end to our audio journey.
Crucially, understanding how to fix headphones grainy sound can make all the difference between an immersive listening session and one that feels degraded—distorted, blurry, or pixelated, if you will.
In this article, we will be focusing on how to identify the causes of grainy sound from your headphones and how you can—once and for all—resolve the grainy noise.
We’ll delve into the answers to questions you may have, such as:
- What does grainy sound mean?
- Why you should fix grainy headphones fast
- Why do headphones sound grainy?
- How to fix headphones grainy sound
Through knowledge, resources, and many tips, you’ll be sure to leave this article with a full understanding of why your headphones sound grainy and with the ability to troubleshoot and fix it.
Let’s dive in.
What Does Grainy Sound Mean?
What does grainy sound mean? Grainy sound is an unpleasant, static-like noise that impairs your audio experience. The term is used to describe an audio recording or playback that sounds dull, muffled, and made up of minuscule particles as if the sound has been coated in sand or “grains.”
This noise distortion can occur when the connection between your audio source, headphones, or cables is either failing or not quite properly aligned. This type of audio issue is usually the result of poor-quality recording or playback due to a lack of bandwidth, background noise, distortion, and static noise from electrical noise.
Consequences of Grainy Audio
Addressing grainy audio—stemming from dirty jacks, faulty cables, or signal issues—impacts trebles the most by:
- Detail loss: Grainy sound obscures high frequencies, hindering instrument and harmony distinction and reducing enjoyment.
- Transparency loss: A lack of transparency implies reduced clarity of individual recording elements, making it challenging to discern subtle musical nuances.
- Harshness: Graininess may cause shrill treble frequencies, leading to listener fatigue or discomfort during high-pitched music.

In the low-frequency spectrum, grainy audio impacts bass and midrange through:
- Muddiness: Grainy sound blurs low frequencies, causing a muddy or boomy bass response.
- Lack of separation: Poor audio quality hinders distinguishing instruments or voices in the midrange, creating a congested sound.
- Distortion: Graininess introduces unwanted noise and distortion, especially in lower frequency ranges.
- Dynamic compression: Grainy audio reduces the dynamic range, making it challenging to discern loud and soft passages.
Reasons Why Headphones Sound Grainy
What causes grainy sound and why do headphones sometimes produce such a weird, fuzzy audio experience?
The answer to this looming question lies in the overarching issue of bad headphones sound quality:
- Digital audio processing
- Poor wireless transmission and audio compression
- Connectivity issues
- Low bit-rate audio settings
- Faulty or blown drivers
Digital Audio Processing
In digital audio processing and recording, grainy sound can often be a distinct result of digital audio processing, both desirable and undesirable sound characteristics.
Intentionally, one may use granulation to bring a unique, striking textured atmosphere brought on by small ‘grains’ of the audio signal (usually between 1 and 50 milliseconds in length). This is achieved by manipulating the sample-rate or resolution reduction through bitcrushing and downsampling, which contributes to a LoFi sound.
Various parameters, such as pitch, amplitude, panning, filtering, etc., can also add grit and distortion to achieve a desired grainy sound.
On the other hand—unintentionally—grainy sound could originate from:
- Low sample rate, bit depth or poor analog-to-digital conversion in the recording process. This can result from using low-quality audio interfaces or microphones.
- Extreme data compression techniques (MP3 encoding, etc.) improperly implemented. If you notice your wireless headphones making crackling noise, it might be due to audio compression issues.
- Weak wireless signal or low-quality Bluetooth compression algorithms. This is often experienced when one Airpod keeps cutting out.

Ultimately, grainy sound can be produced unintentionally or intentionally in the recording process, giving the sound engineer the means to produce a grainy, gritty, pixelated texture and evoke specific atmospheres or add artificial details.
Wireless Interference and Audio Compression
Wireless headphones are prone to interference from other electronic devices and radio signals. This interference can cause the audio signal to distort, resulting in a grainy sound.
If you’re experiencing buzzing noise in headphones, the most likely culprit is wireless interference coming from nearby electronic devices, appliances, and other wireless headphones.
Audio compression algorithms used to transmit data can also lead to a loss of audio quality and graininess.
However, wireless devices in the 2.4 Ghz radio frequency range compete for the same spectrum, which can lead to an increased risk of packet loss and, therefore, a reduced audio quality.
Connection Issues
Another common reason for grainy sound in headphones is poor connection between the audio source and the headphones resulting from:
- Damaged headphone jack or audio port—oxidation of the metal contacts within the jack may lead to analog signal degradation.
- Frayed cables: broken cables can cause intermittent connections and thus poor audio quality.
- Signal dropouts due to physical obstructions, interference from other devices, loose connections within the headphone jack, and even low battery levels in wireless headphones.
- Pairing issues with Bluetooth headphones
In conclusion, grainy sound often results from connectivity issues—a damaged headphone jack or audio port, frayed cables, or broken connections—compounded by oxidation and signal dropouts.
Low Bit-Rate Audio Settings
Lastly, low bit-rate audio settings can also cause grainy sound in headphones. Bit-rate refers to the amount of data used to represent a second of audio.
The sound quality suffers when playing music or other audio files with low bit-rates—or if the PC’s default audio format is set to a low bit rate. Thus, simply adjusting the bit-rate settings in the audio player or modifying the default audio format in the PC’s settings can bring about a noticeable improvement in sound quality.
Along with the right audio settings, use high-quality headphones and audio files with a minimum of 256 kbps bit-rate or lossless formats like FLAC or ALAC for optimal results.
Best Audio Bitrate
The optimal bitrate for an audio file depends on its designated purpose and mode of transmission. High bitrates provide exceptional sound quality but might be unsuitable for streaming or substandard hardware.
- Audio CD bitrate is a remarkable 1,411 Kbps
- MP3s can span from a modest 96 to an impressive 320Kbps
- Streaming platforms like Spotify typically proffer between 96 and 160Kbps
It’s crucial to assess your audio equipment and playback transmission method when selecting the appropriate Bitrate for your audio files—striking the right balance between quality and compatibility is essential.
Faulty or Blown Drivers
Grainy sound in headphones can also be caused by faulty or blown drivers. The driver is the component responsible for converting electrical signals into sound waves—and if it’s damaged or not functioning optimally, it can result in inferior audio quality.
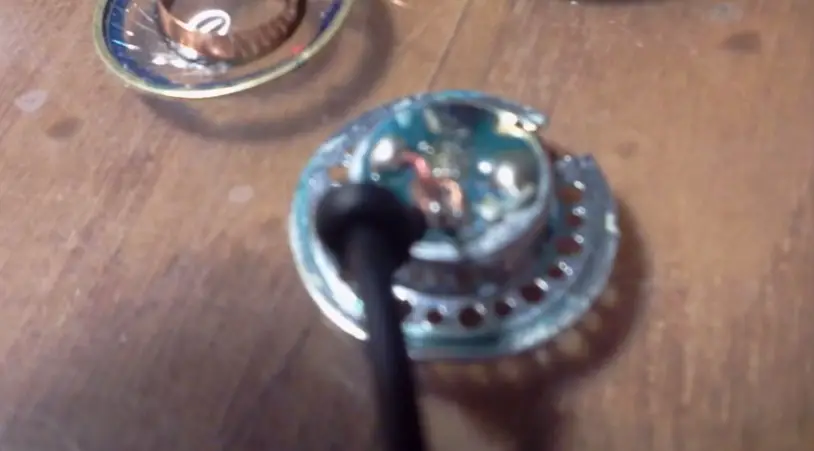
Some common signs of a blown driver include:
- Headphones crackling at high volume, absence of bass response, or experiencing distortion due to damaged components.
- Another issue you might encounter is when your headset sounds like underwater, which stems from a damaged diaphragm or voice coil in the driver.
- You may also notice a lack of clarity, muffled sound, or an imbalance in volume, making one headphone louder than the other.
- If you’re wondering why is my headphone volume so low, a blown driver can the culprit.
- Clipping from excessive bass: If you’re looking to improve audio clarity, learning how to reduce bass in earphones does wonders.
- Diaphragm wear: Prolonged use can cause headphone diaphragms to degrade, resulting in unclear, distorted audio.
- Physical damage: Dropping or moisture exposure may harm headphone drivers (especially planar drivers), leading to grainy sound.
To fix blown driver audio problems, replace the damaged headphone speakers, or try various troubleshooting methods such as checking the audio source and cable connections or learning how to fix earphones sound distorted.
Quick Troubleshooting & Solutions for Grainy Audio
Before buying a sound card, replacing your headphones speakers, or performing any drastic change, troubleshoot the grainy sound issue by following these steps:
- Verify headphone connection
- Test various audio sources
- Assess sound card with alternate headphones/speakers
- Update drivers/software: Ensure up-to-date audio drivers and software by visiting the manufacturer’s website or using your device’s update feature.
- Fine-tune audio settings: Adjust volume, balance, equalization, sample rate, and bit depth in your device’s sound settings.
- Disabling audio enhancements in Windows 10 and 11 is also necessary. Turn off built-in enhancements in sound settings or specific applications to avoid grainy sound.
- Avoid electromagnetic interference: Keep headphones distant from other electronics or cables that may cause interference.
How to Fix Grainy Sound in Headphones
Here are several things you can do to fix grainy headphones:
- Opt for lossless audio files: Lossy formats like MP3 often compromise on quality, whereas lossless formats such as FLAC maintain a higher bit rate, thus higher audio resolution with a smoother audio experience.
- Change the default audio format: Learn how to change your device’s default settings—be it Windows 10, Windows 11, Mac, or Android—to ensure optimal audio performance.
- Clean the dirty headphone jack: Accumulated grime can impede sound quality. If the issue persists, check to see if the speakers are blown or need repair.
- Increase the minimum processor state in the system settings, as this can contribute to a fuzzy background noise in laptops.
- Turn off active noise cancellation; this feature is known to produce a fuzzy noise when music is not playing.
In short, taking these steps—cleaning the jack, replacing damaged drivers, tweaking processor state settings, and disabling audio enhancements—will help fix grainy sound in headphones.
Use Lossless Audio Files
Sometimes, even when using lossless audio files like FLAC, unwanted grainy sound may occur due to associated bitcrushing and quantization artifacts, compression induced, low-frequency interval aliasing, and distortion caused by the Nyquist theory.
However, using lossless audio files can significantly reduce the grainy sound in your headphones caused by the lack of definition in compressed files. Lossless formats like FLAC, ALAC, or WAV preserve the original audio quality and provide a better listening experience.
Identifying Genuine Lossless Files
Also, determining the authenticity of a FLAC or WAVPACK audio file’s origin—whether it was encoded from a lossless or lossy source—can be quite challenging.
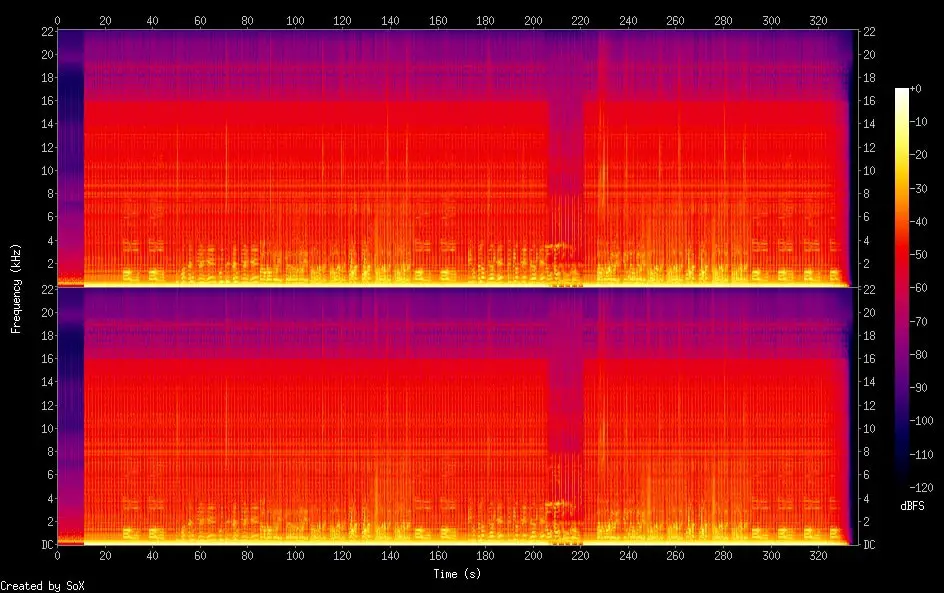
By creating a spectrogram, one can unveil the subtle differences between the two formats. Though a genuine lossless file exhibits an extended frequency range up to 22.1kHz, its lossy counterpart reveals encoding artifacts and limitations. A sharp roll-off of audio frequencies above 16 kHz or misaligned frequencies will be telltale signs of audio data subjected to lossy compression.
Utilizing tools like Tau Analyzer/AuCDtect and Lossless Audio Checker can further assist in identifying potential discrepancies within these audio files.
Change Default Audio Format
Once you start using lossless audio files and gain a better understanding of their nuances, you can then change your default audio format to one that offers higher-quality playback
To change the default audio format on your PC, follow these steps:
For Windows
- Right-click on the speaker icon in the taskbar and select “Sounds.”
- In the “Playback” tab, find your default playback device (usually marked with a green checkmark) and click on “Properties.”
- Go to the “Advanced” tab.
- Under “Default Format, “click on the drop-down menu and select a different audio format (e.g., 24-bit, 48000 Hz) and click on “Test.”
For macOS
- Open “System Preferences” by clicking on the Apple menu in the top-left corner of your screen and selecting “System Preferences.”
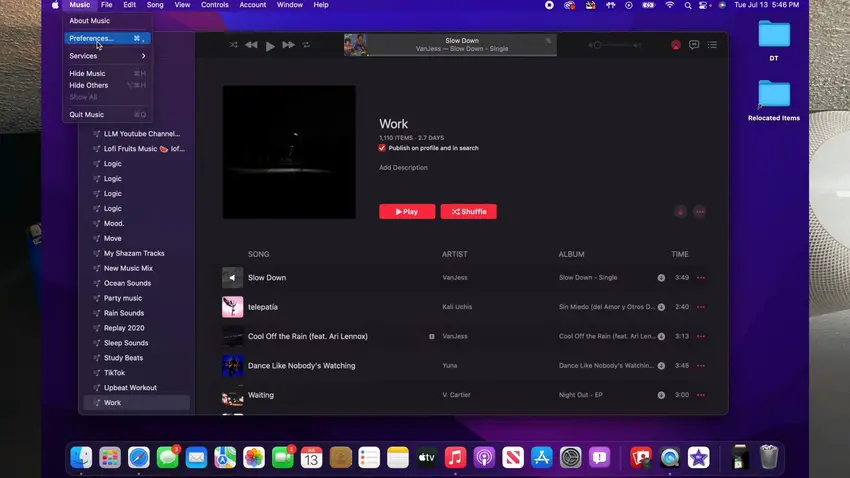
How to change Bitrate on macOS (From Liam Lopez Reviews) Step 1 - Go to the “Playback” tab and check the “Lossless audio” setting under “Audio Quality.”
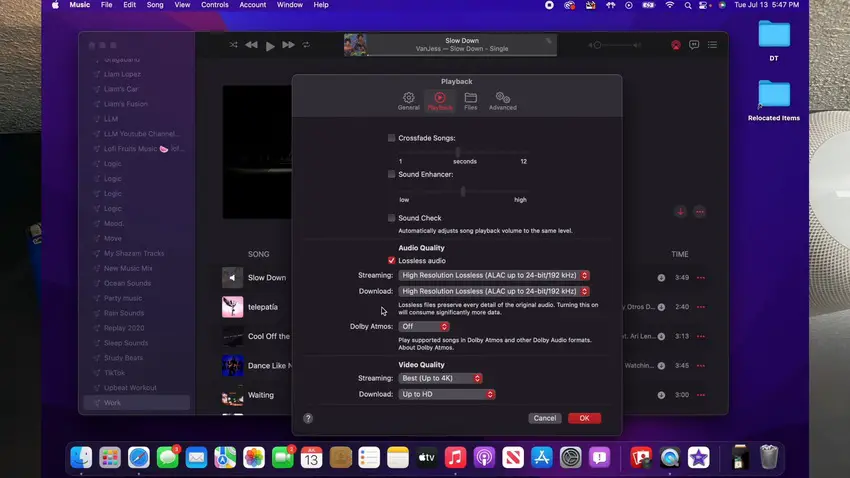
How to change Bitrate on macOS (From Liam Lopez Reviews) - Select a high-resolution audio format (e.g., High Resolution Lossless ALAC up to 24-bit/192kHz) from the drop-down menu.
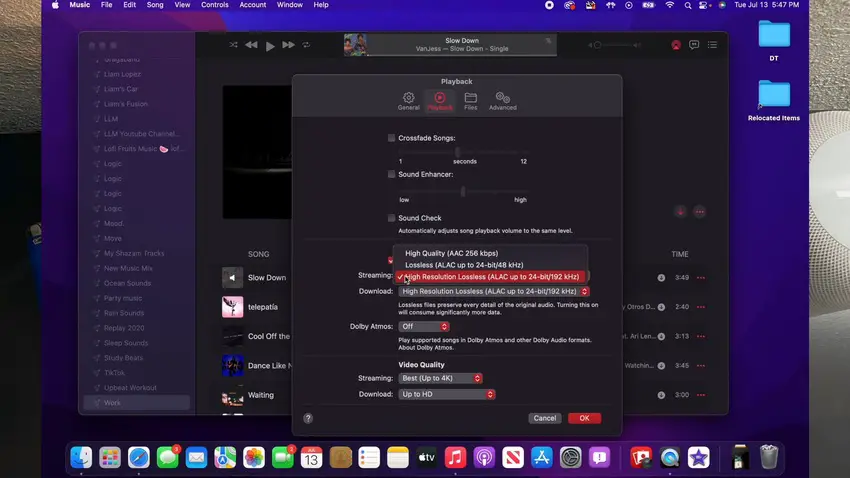
How to change Bitrate on macOS (From Liam Lopez Reviews)
Android
To take advantage of your smartphone’s high-resolution audio capabilities:
- Ensure you have a compatible device with the necessary hardware.
- Obtain lossless music files in formats like FLAC or ALAC that support 24-bit/192 kHz.
- Download a high-resolution audio player app for Android or iOS that supports these file formats and allows you to change the default output settings. Here are a few apps:
- If you prefer convenience, invest in high-resolution wireless headphones with high bandwidth codecs like LDAC, aptX HD, or aptX Adaptive.
Can Android smartphones Play Lossless Audio?
Smartphones have come a long way in terms of audio quality, with some devices boasting high-fidelity audio capabilities. For example, the Sony XPERIA 1 II offers 360 Reality Audio support and LDAC support for higher-quality Bluetooth streaming. The LG V60 ThinQ features a Quad-DAC with 32-bit/384kHz capabilities.
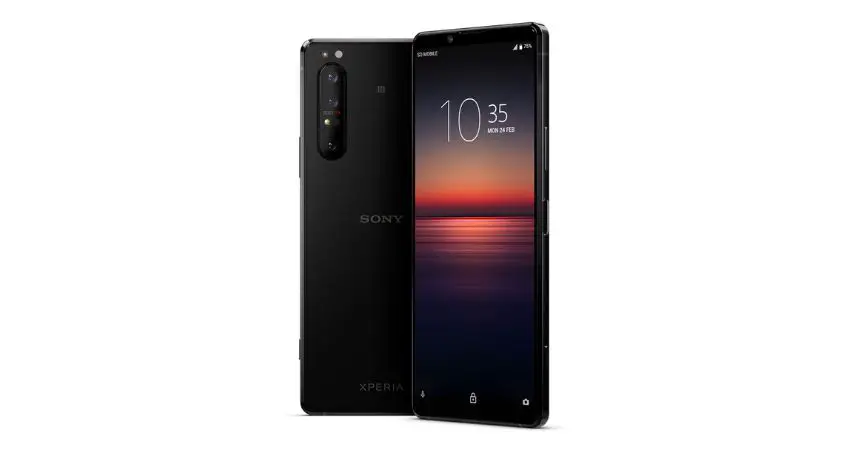
But can smartphones play lossless audio at 24-bit/192 kHz?
The answer is yes, but there are some caveats. First, your smartphone must have the processing power to decode such high-resolution files. Second, the built-in digital-to-analog converter (DAC) may have limitations that prevent it from outputting true 24-bit/192 kHz audio.
iOS
While iPhones and iPads may not be as well-known for their audiophile-grade hardware as some Android devices, they can still provide high-resolution music playback.

Enable higher bitrate on iPhone by downloading a third-party music player like VOX – MP3 & FLAC Music Player to play and stream high-res audio files.
For higher streaming quality, follow these steps:
- Open the “Settings” app on your iPhone or iPad.
- Scroll down and tap on “Music.”
- Under the “Downloads” section, you will find the “Mobile Data” option.
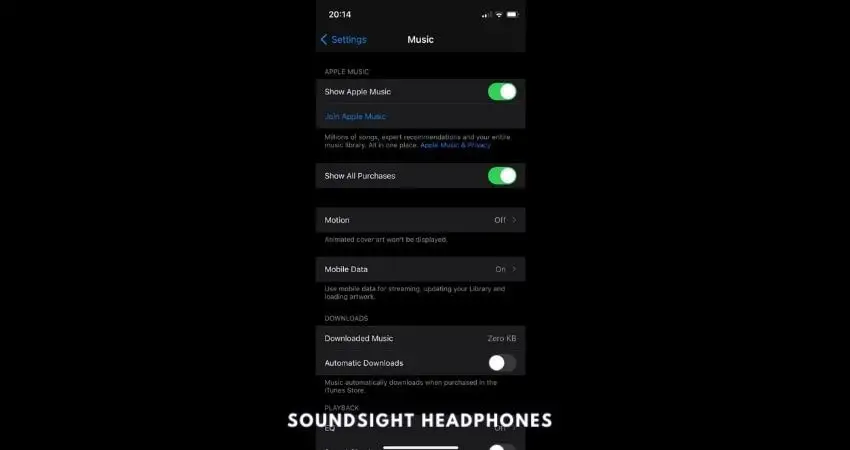
Click on Mobile Data - Tap on “Mobile Data“.
- Here, you can toggle the switch for “High-Quality Streaming.”
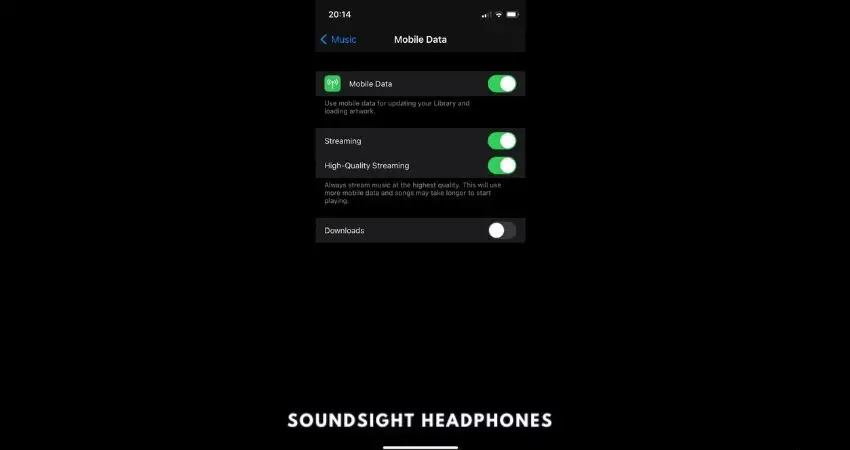
Tap on High-Quality Streaming
Streaming Apps
Let’s dive into the nitty-gritty of changing the bitrate on your Streaming app.
- Open your preferred music streaming app: Popular choices include Spotify, Google Play Music, Amazon Music, etc.
- Access the app settings: This is usually done by tapping on the three horizontal lines or gear icon located in the top left or right corner of the screen.
- Find audio quality settings: Look for a section labeled “Audio Quality,” “Music Quality,” “Playback Settings,” or something similar.
- Change bitrate: You should see options for different bitrates, such as low, medium, high, or even specific numbers like 96kbps.
Dirty Headphone Jack
Listen up – no one likes grainy sound coming from their headphones, let alone distorted trebles that rob us of the perfect guitar solo or falsetto chorus. To get your audio quality crystal-clear, here’s what you can do:
- Examine the inside of your headphone jack and see if it’s dirty.
- Gently clean the inside of the jack using a cotton swab and rubbing alcohol, or even a WD-40 contact cleaner if you have one.
- Use caution and make sure not to push any debris further into the port.
Is it Safe to Clean Your Audio Port?
Absolutely! Cleaning your audio port is not only safe but also essential for maintaining optimal sound quality from your headphones. Just make sure you follow proper cleaning techniques (which we’ll discuss shortly) so as not to damage the physical contacts.
Blown Speakers
A blown speaker occurs when a critical component responsible for producing sound malfunctions due to damage or failure. This can result in audio crackling, popping, or fuzzy noises that make you want to pull your hair out.
If you’re experiencing these audio issues, there are a few potential culprits:
- Damaged diaphragm: The diaphragm is the part of the speaker that vibrates to create sound waves. If it’s damaged, torn, or dented, it can cause distortion and poor audio quality.
- Voice coil issues: The voice coil is responsible for converting electrical signals into mechanical vibrations that move the diaphragm. If it’s damaged or misaligned, your audio may suffer.
- Loose connections: Sometimes, poor audio quality can be attributed to loose connections within your headphones’ internal wiring.
Now that we’ve identified some possible causes, let’s dive into potential solutions:
Fixing Dented Headphone Diaphragms
If you hit or dropped your headphones hard and the diaphragm has dented, here’s a step-by-step guide on fixing dented headphone diaphragms:
- Use a solder vacuum like in this video to suck out the dent gently.
- Another option is to use a small suction cup or a rubber bulb syringe (like those used for cleaning camera lenses). Press it gently against the dented area and then slowly release it, creating a vacuum that should help pull out the dent.
- If the vacuum method doesn’t work, you can try using a small piece of tape. Press the sticky side of the tape onto the dented area and carefully lift it off, trying to pull out the dent in the process.
Voice Coil Issues
If you think the voice coil is damaged or misaligned:
- First and foremost: consult a professional technician for repair
- If you have confidence in your technical ability, explore DIY headphone speaker coil repair tutorials on YouTube.
Loose Internal Connections
To fix loose internal connections, follow these steps:
- Carefully open your headphones or speaker casing to expose the internal wiring and components.
- Inspect the wires for any loose connections.
- If you find a loose connection, use a soldering iron to reattach the wire to its proper place on the headphone driver.
Minimum Processor State
The minimum processor state helps preserve battery life on laptops but can also cause crackling and popping sounds in headphones. Grainy sound is also a result of a processor running too slow.
To fix this issue, you need to disable CPU throttling by following the steps below:
- Right-click on Start button, and click “Power Options“.

Navigate to Start Menu to open Power Options - In the right sidebar, select “Additional power settings.”
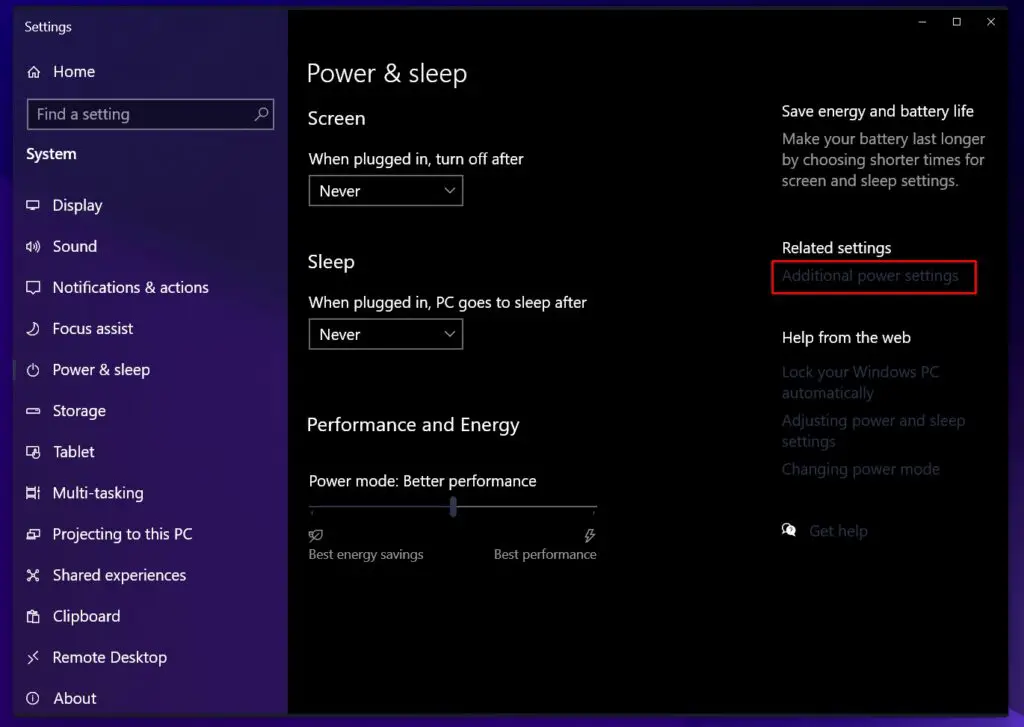
Select Additional Power Settings - In the list of power plans, select Balanced and then click on “Change Plan Settings“.
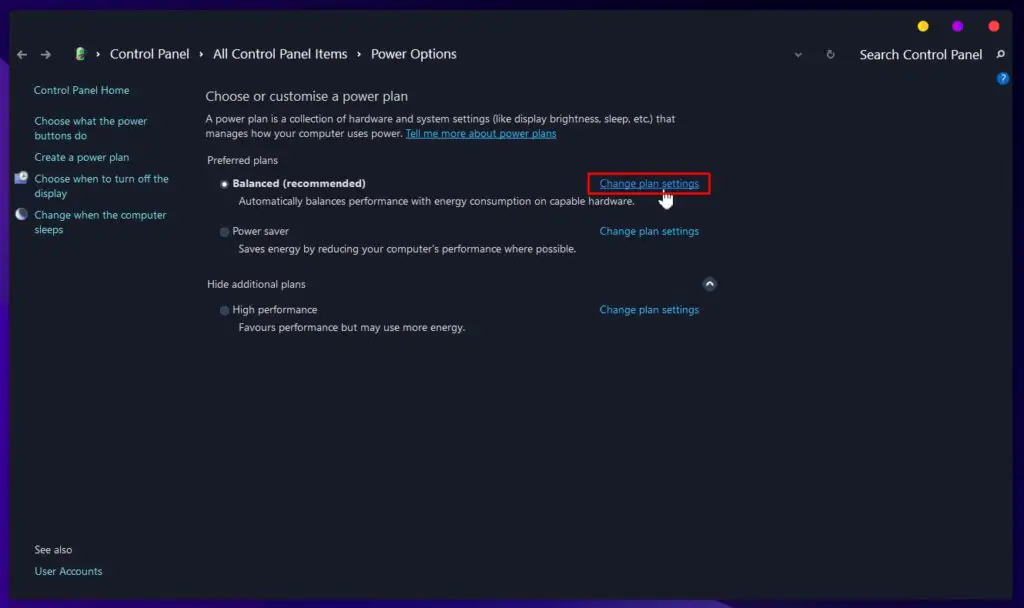
Select Preferred Power Plan and Change Plan Settings - In the next window, click on “Change advanced Power Settings,” scroll down to “Processor Power Management” and click on it.
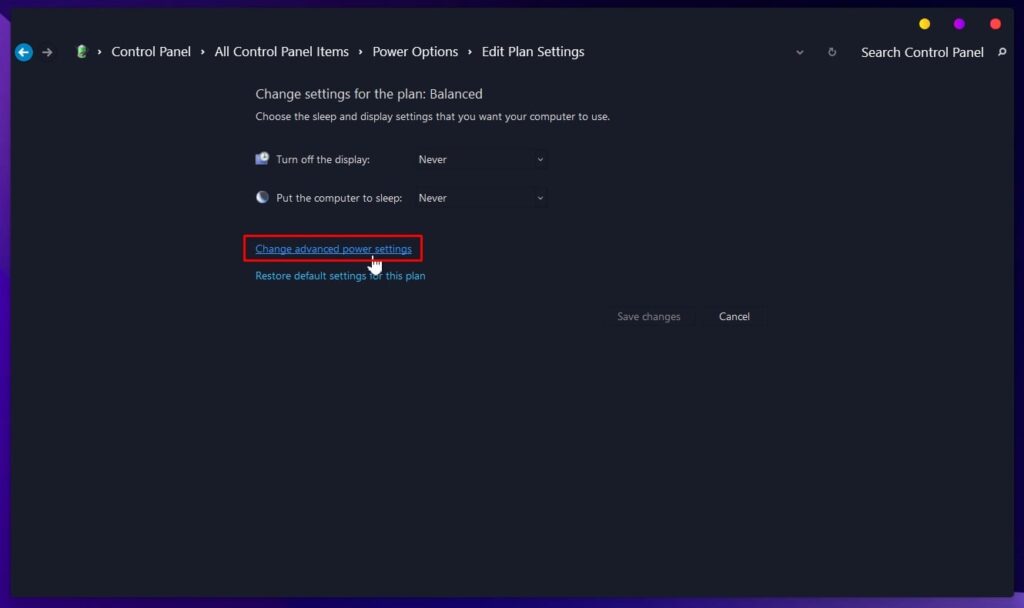
Change Advanced Power Settings - Expand the “(*%s of maximum performance)” item and set both “On battery” and “Plugged in” values to 100.
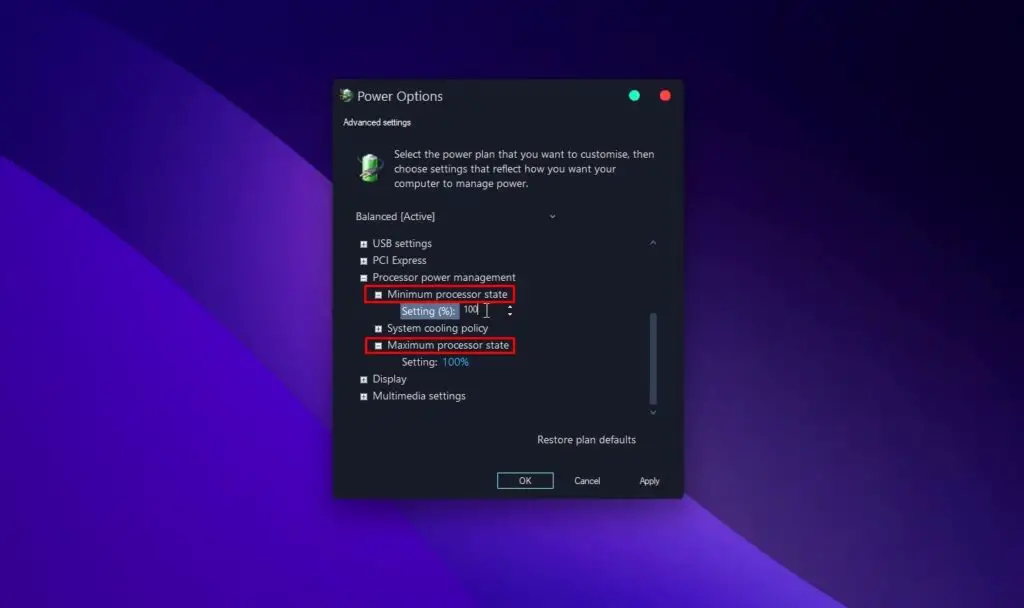
Set Min & Max Processor State to 100
This should get rid of the grainy sound or crackling noise coming from your headphones.
Sound Card Issues
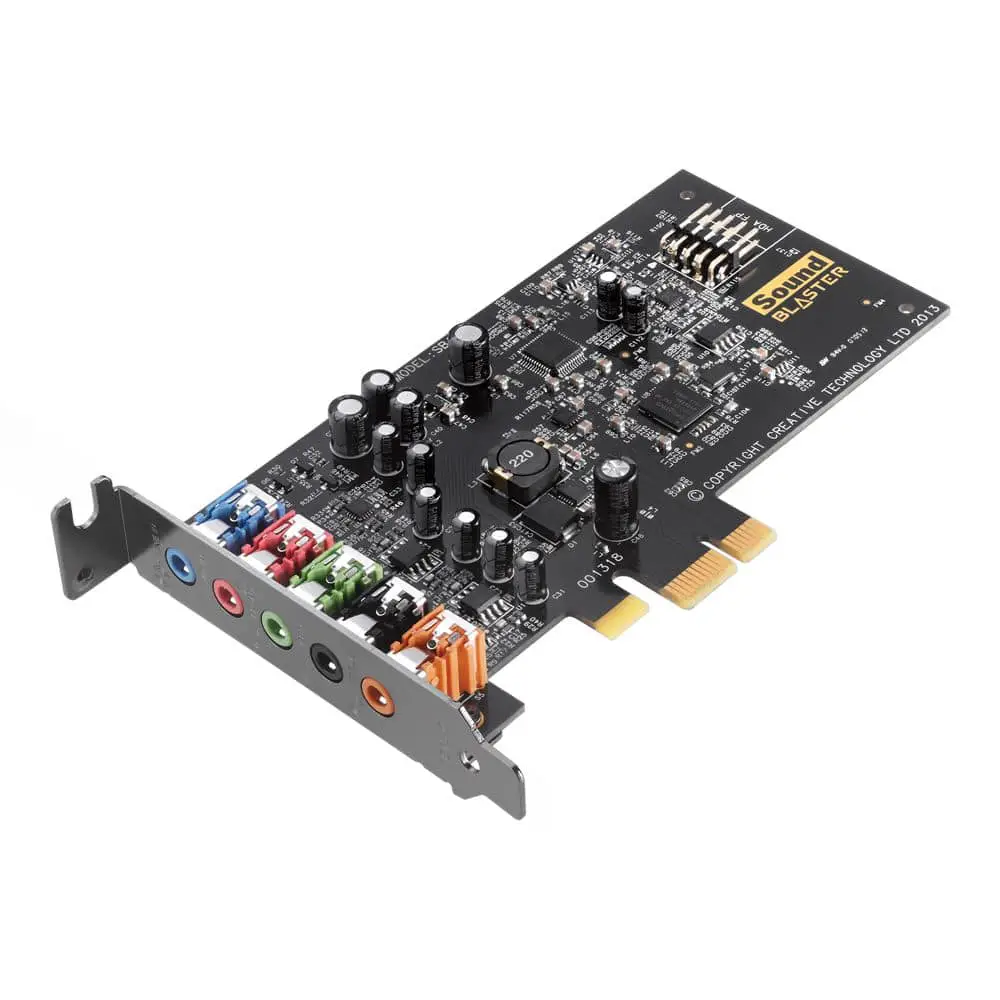
You know what they say—garbage in, garbage out. And when it comes to sound reproduction, grainy sound in headphones can often result from hardware issues like a weak sound card or audio conversion mishaps.
Sometimes, low-quality sound cards struggle with handling multiple audio streams concurrently, causing playback issues.
To avoid these problems, invest in a high-quality sound card for excellent audio performance:
- High SNR (100 dB+ for audiophiles/professionals)
- Minimum 24-bit/96 kHz bit depth and sample rate (32-bit/384 kHz for serious users)
- Quality DAC chip (e.g., ESS Sabre, AKM, Burr-Brown)
- Adequate connectivity options for your equipment
Recommended Sound Cards
