Audio reversed in headphones, and you don’t know what to do? This headphone audio problem has overtaken the internet – yet fear not! We have a solution!
Listening to your favorite game or music with inverted audio is incredibly frustrating. The good news is that there’s a way to reverse audio in headphones quickly from PC, Xbox consoles, and beyond.
This guide offers helpful tips to get the inverted audio sorted out. It will explain the cause of reversed audio while playing games and provide tips on how to fix this frustrating problem.
We’ll provide you with easy-to-follow steps to invert the audio and get back to enjoying your favorite games, videos, and songs.
Furthermore, we’ll break down the following topics:
- What is audio inversion, and what does it entail?
- What causes reversed audio in games (any game you get into)
- How to flip left and right channels on Android devices
- How to fix inverted audio on PC and Xbox One
By following our guide, you’ll learn the steps to fix inverted audio in no time. Let’s get started!
Inverted vs. Reversed Audio: Debunking The Difference
Audio has the magical ability to evoke emotion. It also comes with many nuances: one such complexity lies in the difference between inverted and reversed audio.
The difference between the two terms depends on the frame of reference they’re used. For example, inversion applies to polarity, whereas reversion applies to phase.
To better understand the point, here are some audio concepts and their meaning:
- Phase reversal: A tool or function that helps you avoid phase cancellation by reversing the phase of two audio signals.
- Phase reversion: The practice or technique of reversing the phase of one audio signal and combining it with another signal to achieve a desired effect.
- Polarity inversion: Polarity inversion occurs when a piece of audio’s waveform is flipped inward. You can think of it as a reflection — the flipped waveform is the mirror image of the original waveform.
- Reversed stereo signal: Switches the arrangement of left & right audio channels and alters sound features such as spatial balance and width. Any directional audio will be reversed as well — for example, a vocalist panning between left and right channels, making your headphones sound different in each ear.
In the music production world, the terms “inverted” and “reversed” are strictly tied to concepts like polarity and phase and have multiple meanings.
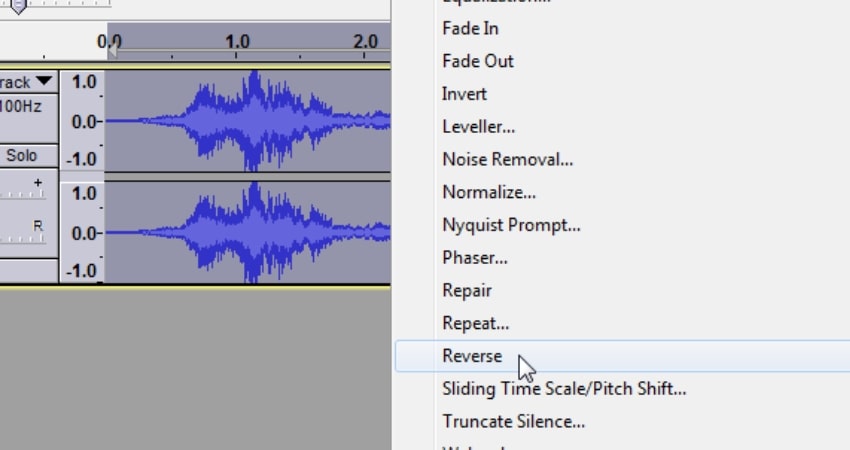
For some, reversed audio means music played backward: from the end to the beginning.
But for users of which the headphone’s audio is reversed/inverted, it means something entirely different.
What Reversed Audio Means
When headphone users ask themselves “why is my headset audio reversed?”, they refer to the issue of audio coming from the opposite direction.
In their case, directional audio is reversed, and sounds coming from the left are heard in the right ear, and vice versa; front sounds come from the back, and back sounds come from the front.
Reasons Why Your Headphones Audio Reversed
The reasons why your headphones sound inverted are related to one of these three factors:
- Mismatched decoding of audio signals
- Partially inserted headphone jack.
- Inverted polarity in audio transmission
Audio Decoding Mismatch
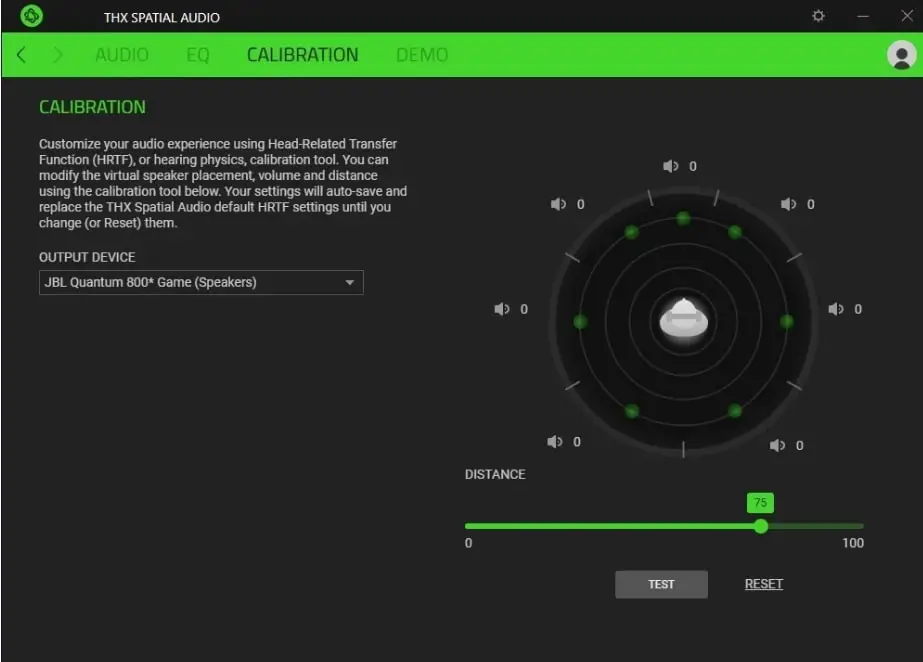
We configure our headsets to use surround sound via THX Spatial Audio and other EAX (Environmental Audio Extensions). However, Windows or in-game audio settings may override these configurations, or the system’s settings don’t enable spatial sound.
Sometimes, the digital signal gets mis-decoded or mis-processed. While other times you use a Dolby Stereo decoder with a headset that has no built-in decoder features.
All these problems lead to a mismatch in audio decoding leading to reversed audio. Then again, the process of encoding and decoding audio across various applications can get lost in translation.
How Surround Sound Decoders Work (And Invert Audio)
Surround sound effects can cause the direction of the audio output to be inverted or reversed, resulting in the sound from your headphones being different than when the digital audio input signal was processed.
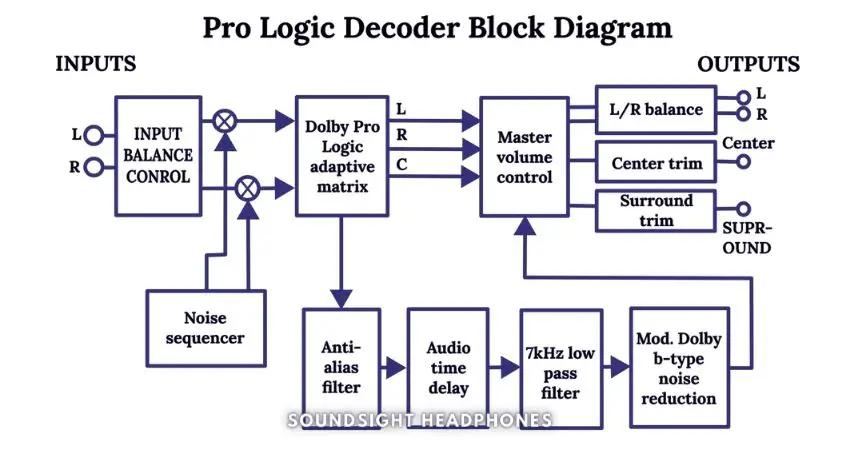
Surround sound decoders like Dolby Stereo provides a full 3-dimensional audio effect by applying a variety of sophisticated functions and sound enhancements—such as a 7 kHz low-pass filter, modified Dolby B-NR, Noise Sequencer, Adaptive matrix, Surround sound volume, Central master volume, and Surround trim—on the principle of phase shift technology.
It first separates the signal into the L, C, R, and S channels. The L and R channels are sent directly to the output channels with no modifications. The C channel is split in two and sent, with a 3 dB reduction, to Lt and Rt.
The surround channel (S) is also split in two before being sent to Lt and Rt, but three processing steps precede this: frequency band-limiting from 100 Hz to 7 kHz, Dolby B-type noise reduction, and ±90° phase shifts, creating a 180° phase differential between the signal components feeding into Lt and Rt.
As you can see, things can go wrong in all sorts of ways when dealing with digital surround sound decoders, either due to audio processing, a mismatch of settings, an incompatible system or headset, or connecting headphones through devices that cannot convert/decode the surround sound signal.
Jack Halfway Plugged In
When the headphone jack isn’t fully inserted or won’t stay seated properly, causing an inadequate connection. This can result in only one headphone working, audio glitches, mono mode playback, different sounds on each side, scratchy sound, or stereo channels reversed.
The headphone socket’s internal mechanism that detects when a plug is inserted may also be faulty or dirty; thus, it cannot detect a fully inserted plug.
Don’t let this looming issue ruin your listening experience any longer. You can fix headphones with reverse audio (sound coming from the opposite direction) by
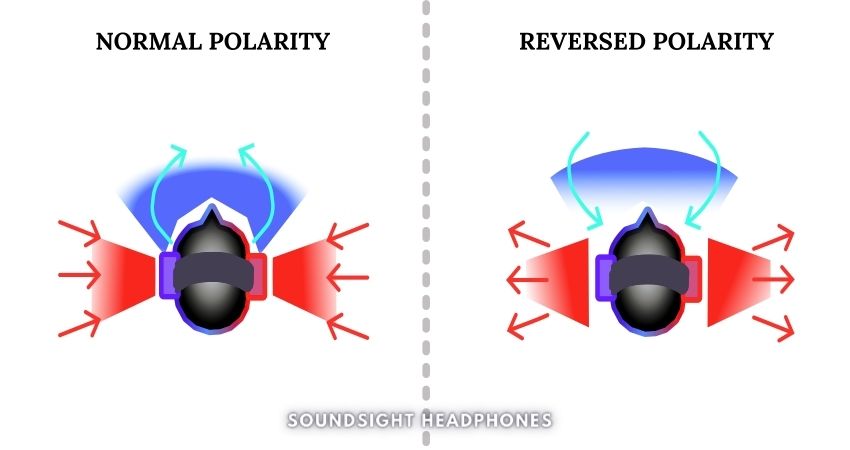
Inverted Polarity Audio
Inverting the audio polarity switches positive and negative signals, which changes the movement of transducers, affecting the soundstage, stereophonic imaging, audio cues, and other sonic attributes of your audio equipment.
How to Fix Reversed Audio in Wired Headphones
You can fix headphones with reverse audio (sound coming from the opposite direction) by:
- Inserting the headphone jack fully
- Plugging your headphones into the soundcard
- Reversing the speaker wires
- Repairing shorted headphones
- Using two headphone splitters
The last two options are more taxing and require some expertise and technical knowledge. Preferably, avoid them and try all the other methods to fix the audio issue.
Insert The Headphone Jack Fully
Ensure the headphone jack is fully inserted into the audio device. An adequate connection is necessary for sound clarity and stereo channels to enter the correct sides. So make sure the plug connects tightly to the socket.
If the connection is loose and the headphone jack only works in certain positions, or the plug of your headphone is too short, consider cleaning the audio port from debris and clean the headphone jack using a cotton swab and rubbing alcohol.
Plug Your Headphones Into The Soundcard
Instances of headset audio reversal when plugging headphones into HyperX Quad Cast microphone or monitor USB hub instead of the sound card or motherboard’s audio port have been observed quite often.
These devices don’t have digital-to-analog converters to handle 7.1 surround sound decoding, generating reversed audio problems.
The best way to fix inverted audio in wired headphones is to plug them directly into your sound card.
HyperX Quadcast S Reverses Headphone Audio
To keep using your microphone, disable surround sound on your PC:
- Right-click the Sound icon in the system tray > Open Sound Settings.
- Open Sound Control Panel > Playback tab.
- Right-click HyperX headset device > Properties.
- Select Advanced > ensure “24 bit, 48000 Hz (Studio Quality)” is default format.
- Go to Spatial sound tab > set to Off > Apply.
- Click the Enhancements tab and disable Virtual Surround.
If the problem persists, disable 7.1 virtual surround in HyperX NGENUITY if installed.
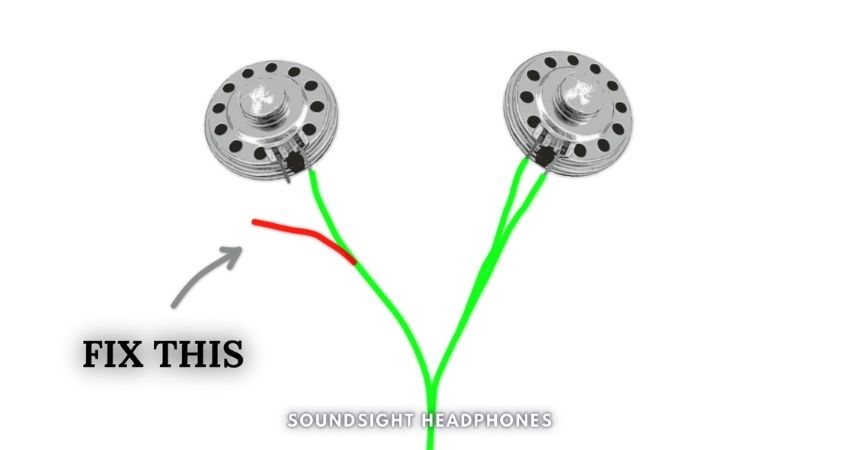
Reverse Speaker Wires
The sound of your new headphones may be consistently inverted with all devices due to a possible wiring issue that alters the signal polarity or a shorted connection on either the left or right conductor.
You can fix inverted audio by rewiring left and right audio channels yourself in two ways:
- Soldering the L/R wires to the other speaker (R/L) (works best with wired earphones like Apple EarPods).
- Swapping the left and right connections in the audio plug to their appropriate/inversed terminals (works better with any other type of headphone).
Only use this method if your headphones consistently play audio in reverse, regardless of the source or application, and have never functioned properly. For example, if the audio is only reversed in the game, skip this part.
First, let’s rule out a shorted-out connection.
- Use a Multimeter to test the continuity of each wire from the audio plug to the speaker drivers.
- Connect it to the ground and each speaker terminal one at a time. Remember that the ground terminal is on either the sleeve (OMTP) or second ring (CTIA), depending on the connector standard.

Continuity test of the headphone jack with a multimeter - You can identify the problematic wire that requires soldering or replacement if there is a break in continuity.
If no short circuit is detected, then it’s time to rewire the headphones:
- Order a 3.5mm stereo DIY plug
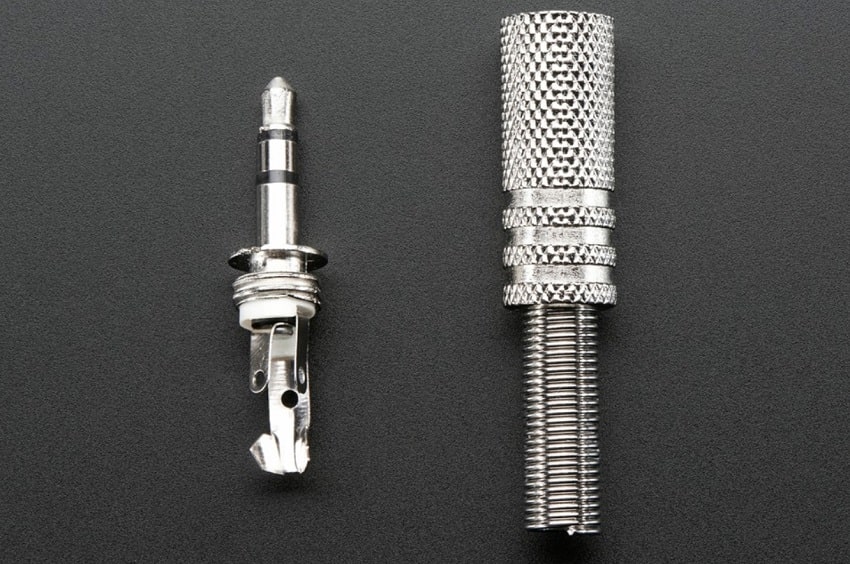
Stereo DIY Plug (From Adafruit) - Remove the old headphone plug from the cable (cut the rubber or unscrew it if possible)
- Insert the screw-on connector into the wire before soldering the wires to the headphone jack.
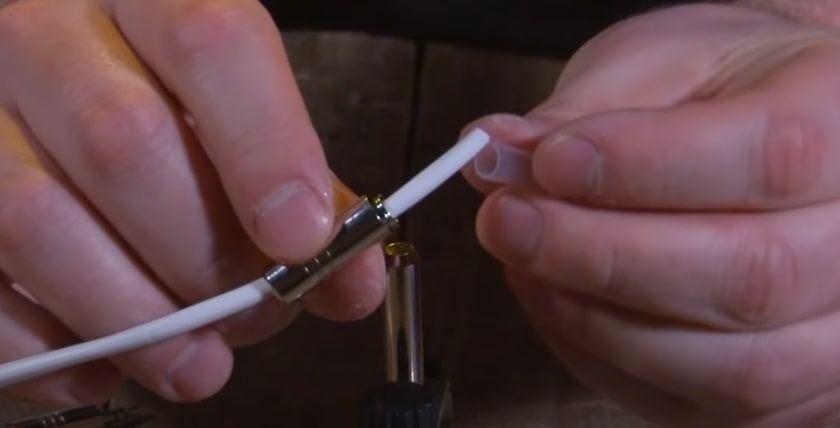
Screw-on insert in the headset cable (From: Dixon Hill) - Strip the ends of the cable wires with the wire cutter to expose the inner copper core and twist the strands together to create a neat wire.
- Heat up the soldering iron and apply a small amount of solder to the wire.
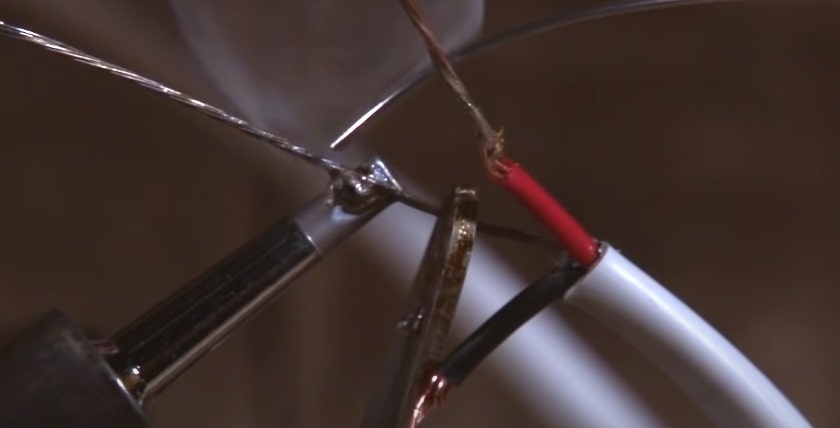
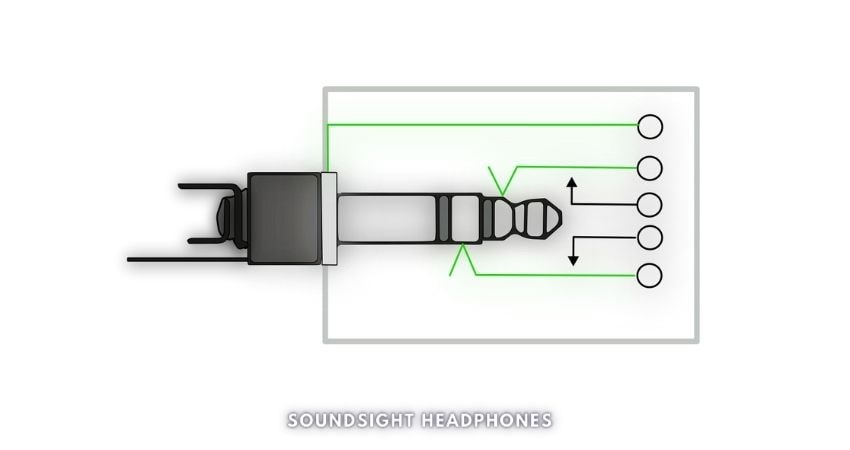
Apply solder to wires (From: Dixon Hill) - Identify which wire is for the left channel and which is for the right channel by headphone wire color code (right audio: red or black; left audio: blue or green; ground: copper or green). The wire connecting pin 1 is for the left channel; pin 2 is for the right channel; pin 3 is for ground.
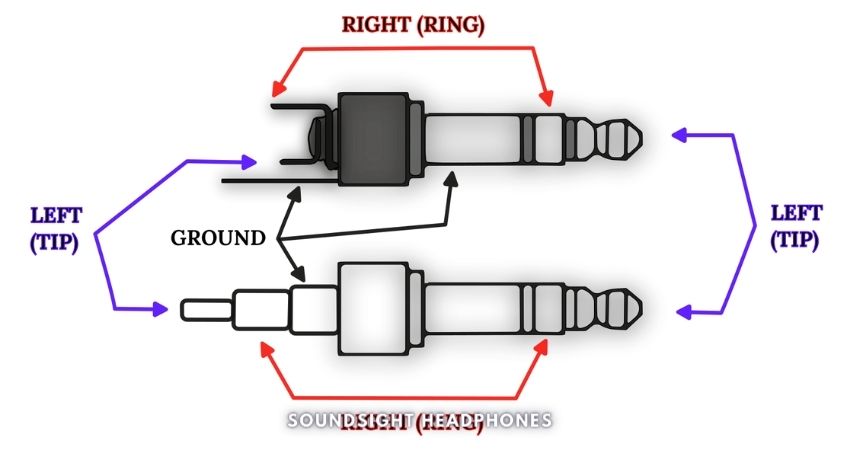
Headphone plug wiring diagram - Insert the wires into the holes of their coresponding pins to make soldering easier)
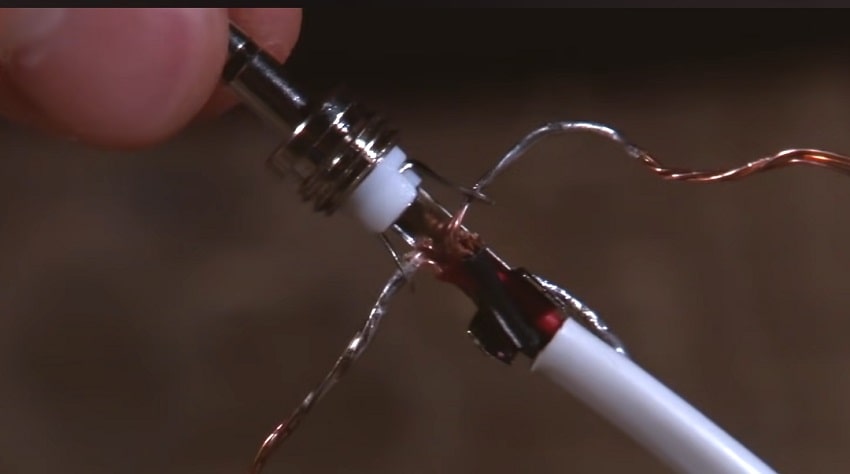
Insert leads through headphone jack holes and solder (From: Dixon Hill) - Solder each wire then cut off any excess
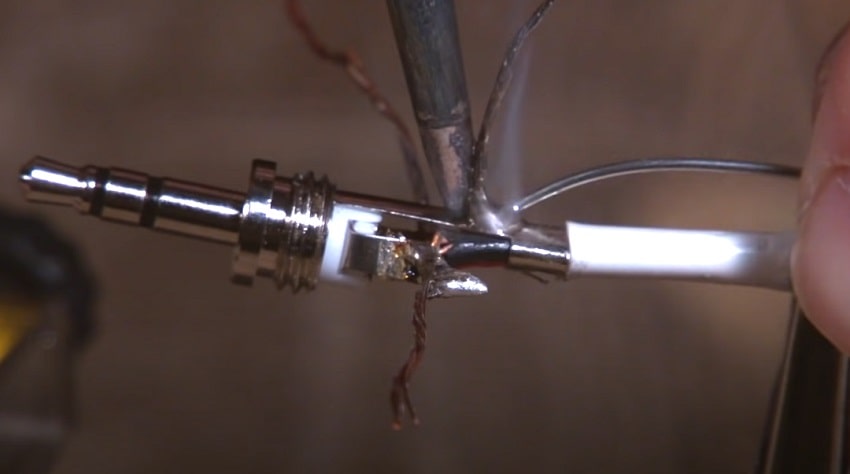
Soldering headphone wire (From: Dixon Hill) - Apply electrical tape over the soldered connections to insulate them and prevent any short circuits.
- Screw on the connector cover and test the headphones to ensure they are working properly.
If you want to reverse the wire connections and have the left signal connecting the right audio pin and vice versa, check step #6 and do the opposite.
Refer to these two videos on how to wire a 3.5 mm headphone jack for visual reference:
Repair Shorted Headphones
Earphones may experience audio problems because of filmsy cables and weak internal connections that are susceptible to short circuits. This can result in one earphone not working, or the audio is reversed.
Here’s how to fix a shorted headphone and resolve the issue:
- Find out which earpiece doesn’t work by listening to them or checking the continuity using a multimeter.
- Locate where the short happens. Inspect and look for signs of damage (exposed wires, worn insulation, and broken strands).
- Solder the parts together if the short is inside the earpiece. If it’s in the cable, bend and twist it while playing music to locate where it occurs.
- Cut off the damaged portion of cable and strip 1/2 inch of insulation from each end.
- Twist corresponding color-coded wires tightly and heat them with a lighter to fuse them.
- Cover the exposed wires with electrical tape or heat shrink tubing.
After this, your headphone should work normally. Refer to this video to fix shorted earphones.
Use a Headphone Splitter
If the audio in your headphones is inverted, a rudimentary way of fixing the issue is by interchanging left and right by using two splitters.
One with a 6.35 mm stereo TRS female to two monophonic left and right male connectors. And another splitter with two inputs and one TRS audio output to plug the two mono connectors into, which you’ll insert into your PC/laptop or smartphone stereo audio output.
To fix inverted audio on headphones, use a headphone splitter cable:
- Buy a 6.35 mm 1/4″ inch TRS stereo female to dual 1/4″ inch TS mono male Y splitter and 1/4″ TRS stereo male to two 1/4″ TS mono female cable.
- Connect headphones to the Y splitter, then connect the two mono connectors to the TRS male to Dual TS female cable.
- Use a 3.5 mm to 6.3 mm adapter to plug the 1/4” TRS stereo male end of the cable into your audio device’s headphone jack.
This should fix the inverted audio issue in your headphones. However, remember that this method may only work with some types of headphones and audio devices. A much better way to reverse audio in headphones is to swap L/R channels with Equalizer APO”
How to Reverse Audio In Headphones on Windows 10
Some simple steps to fix inverted audio on PC and achieve normal stereophony in your headphones involve:
- Reversing audio channels using Equalizer APO
- Disabling surround sound.
Reverse Audio Channels with Equalizer APO
Equalizer APO is the perfect tool for a quick fix to reverse the left and right audio channels in Windows. Here’s how to use it to swap L-R channels:
- Download Equalizer APO from https://sourceforge.net/projects/equalizerapo/
- Configure it to attach to your default output device; this can be changed later with the Configurator tool from the Equalizer APO start menu folder
- Create a new file in C:\Program Files\EqualizerAPO\config, for example:
swapchannels.txt—paste the following line as its only content:Copy: L=R R=L - Open Equalizer APO’s configuration editor and click the green plus icon to add a new configuration for your output device
- Then navigate to the Include configuration file option, and select your
swapchannels.txtfile - Save/Apply the configuration
While this can be a quick headset reversed sound fix (notably for gaming), it, unfortunately, does leave you at the mercy of the flipped audio when you switch to other activities, such as:
- Listening to YouTube
- Watching Movies
- Enjoying Music
Disable Surround Sound
People with virtual surround sound headsets often experience inverted audio. Thus, it’s imperative to disable the conversion of stereo signal into surround signal to avoid sound transmission incompatibility issues along the way—disabling the surround sound feature is usually a simple process:
- Right-click speaker icon.
- Click Open sound settings and select Sound Control Panel.
- Right-click headset and choose Properties.
- Disable all enhancements in Enhancements tab.
- Turn off Spatial sound in Spatial sound tab.
- Apply changes and click OK.
Don’t forget to disable surround sound within gaming sound applications, including:
- Razer Surround
- Logitech G Hub
- Astro Headsets (Press the Dolby Headphone Button on the headset to activate/turn off the virtual 7.1 digital surround feature)
- SteelSeries Base Station (Press and hold the secondary button to toggle surround)
How to Switch Left and Right Headphones on Android
Quickly fix inverted earphones with these few steps:
- Factory Reset your earbuds
- Download the SoundAssistant app from the Google Play Store
Factory Reset Earbuds
Generally, a simple restart of your earbuds should solve minor audio-related issues; but if the inverted sound issue persists after a restart, a hard reset is necessary.
Let’s assume you try to reset a pair of Samsung Galaxy Buds to the factory settings; to factory reset your earbuds:
- Ensure that your Galaxy Buds are fully charged.
- Open the Galaxy Wearable app on your Android phone.
- Click “About Earbuds.”
- Tap Reset Earbuds.
- Confirm by pressing “Reset.“
Factory resetting your audio device can fix various issues, including connection problems, instances in which earbuds keep turning off unexpectedly, update failures, charging issues, and distorted sound.
To reset your earbuds without a phone, follow these steps if you can’t download the Galaxy Wearable app on an iPhone or third-party device:
- Put both earbuds in your ears
- Press and hold the touch pad on both earbuds simultaneously for about 7 seconds until a noise signals that they’re turned off.
- Place the earbuds into the charging case, close the lid, and leave them for 30 seconds.
- Open the lid to check if your earbuds have been reset. Repair them with your device.
Download SoundAssistant
Here’s how to swap the left and right audio channels of your earphones on Android:
- Go to the Google Play Store and download an app called “SoundAssistant.”

Download Sound Assistant - Once installed, open the app and tap on “Advanced settings.”
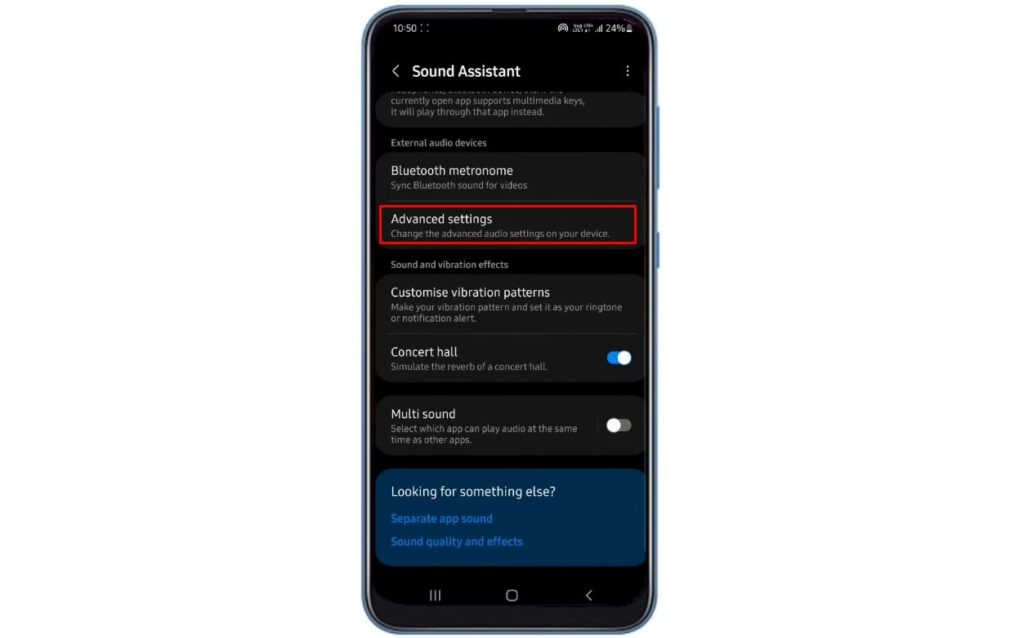
Go to Advanced settings - Toggle the “Reverse stereo” option to switch the left and right audio channels.
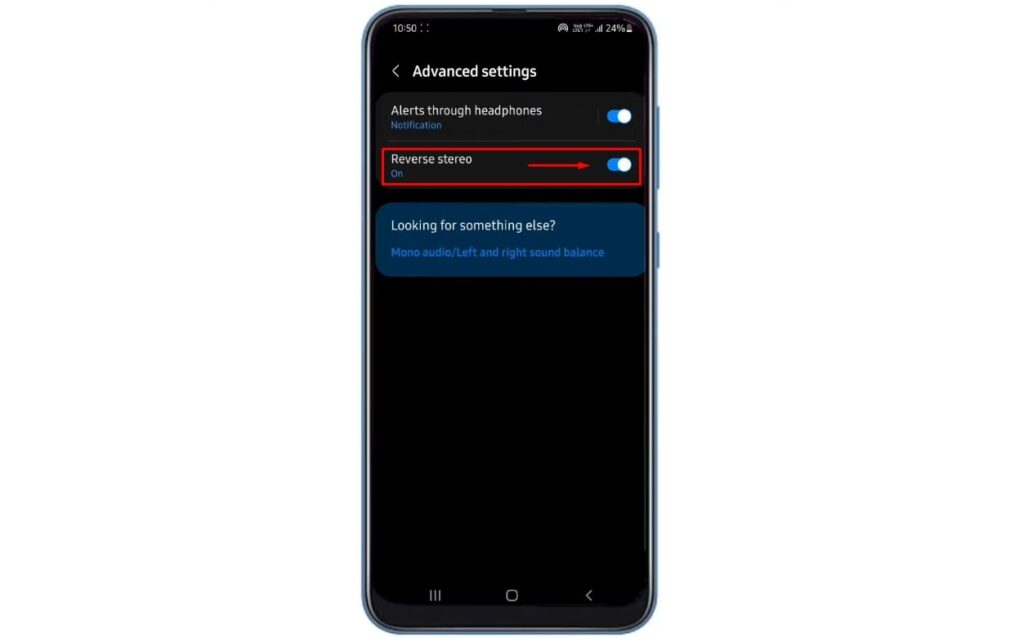
Swap audio channels
Headset Audio Reversed: Xbox One Solutions
The inexplicable and ominous audio reversal that occurs in headsets on Xbox One and other Xbox consoles poses an issue for avid gamers. Thus, we must address this problem with urgency.
Let us focus our attention on the Xbox One console.
Xbox One
In order to reverse audio through your headphone, you’ll need to:
- Configure the Xbox One for Dolby Atmos surround sound if you’re using a 7.1 surround headset.
- Avoid any encoding/decoding audio format mismatch.
Configure the Xbox One for Dolby Atmos Surround Sound.
- Download the Dolby Access app from the Microsoft Store and install it.
- Pay a one-time fee of $14.99 for a license to use Dolby Atmos for Headphones.
- Open the app, select the “Setup” button and follow the instructions for connecting the audio devices and setting up the Dolby Atmos sound profile.
- Go to Settings > General > Volume & audio output and select Dolby Atmos for Headphones from the Headset format drop-down menu.
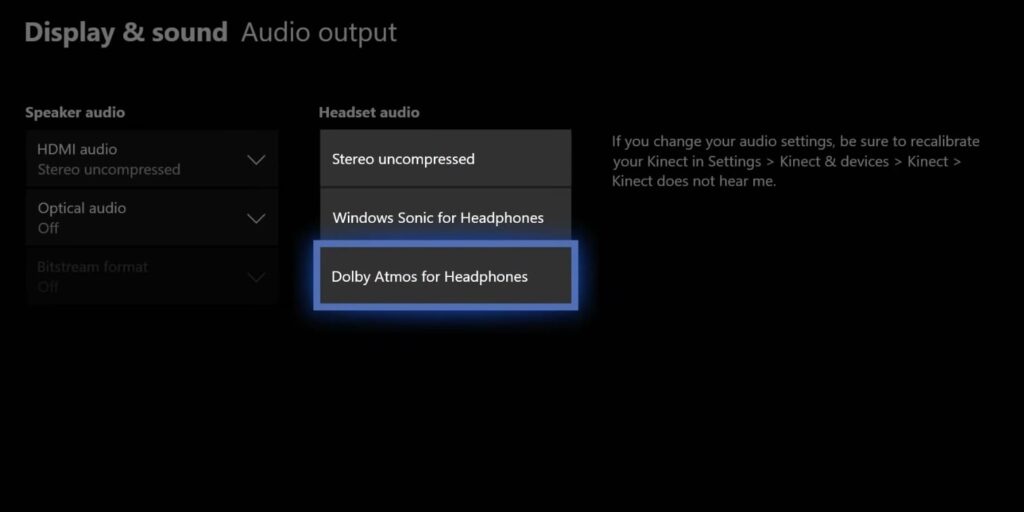
Enable Dolby Atmos for Headphones on Xbox One
Avoid any encoding/decoding audio format mismatch.
Reverse stereo occurs when the encoding and decoding formats of the transmitter and receiver are different.
Steer clear of inverted headphones audio issue on Xbox One with these guidelines:
- Use a Dolby Atmos compatible headset with the controller that has the Dolby Atmos license.
- Select Dolby Atmos for Headphones as your preferred format when playing with a 7.1 virtual surround sound headset.
- If your headset does not support virtualized surround sound or you are using a controller without the Dolby Atmos license, switch to Stereo Uncompressed.
Disconnect Power and USB
A simple “How you tried turning it off and on” goes a long way. Sometimes, the simplest things work the best. Unplugging your Xbox One console and controller from all power and USB connections may solve the issue.